Welcome to Neuridion IDE
A native macOS development environment for the Neuridion programming language.
Neuridion IDE is a fully integrated development environment built from the ground up for macOS. It provides everything you need to write, run, debug, and deploy programs in the Neuridion programming language — all within a single, native application.
The IDE includes:
- Code Editor — Syntax highlighting, line numbers, auto-indentation, and a minimap for quick navigation through your source files.
- Debugger — Set breakpoints, step through code line by line, and inspect variable values in real time.
- AI Assistant — A built-in chat panel powered by Claude that can generate Neuridion code, answer questions about the language, and help you debug errors.
- Form Designer — A visual preview of GUI forms defined in code, so you can see your window layouts without running the program.
- Mail Inbox — A read-only IMAP inbox viewer embedded directly in the navigator sidebar, useful for applications that interact with email.
- Console — Color-coded output panel with support for interactive input via
Console.ReadLine().
Neuridion IDE is designed to be approachable for beginners while offering the tools that experienced developers expect. The Neuridion language itself uses a clean, readable syntax with English keywords, making it an excellent choice for learning programming concepts or building practical desktop applications.
The Welcome Screen
When you launch Neuridion IDE, the Welcome screen appears as the first window. It serves as your starting point for creating new projects, opening existing ones, and exploring the language through built-in examples.
Action Cards
At the top of the Welcome screen, three action cards provide quick access to the most common tasks:
- New Project — Creates a new Neuridion project. You will be prompted to choose a location and name for your project. A
.neuridionpackage is created with aMain.codefile ready for editing. - Open Project — Opens a file dialog where you can select an existing
.neuridionproject to open in the IDE. - Documentation — Opens the Language Guide, a comprehensive reference for the Neuridion programming language, its syntax, and the entire standard library.
Examples
Below the action cards, the Welcome screen displays 39 ready-to-run examples organized into six categories:
| Category | Description |
|---|---|
| Basics | Fundamental concepts: variables, loops, functions, classes, and error handling. |
| Data & Storage | Working with files, folders, databases (SQLite), JSON, CSV, XML, and local storage. |
| Text & Language | String manipulation, regular expressions, encoding, translation, and speech synthesis. |
| System & Security | System information, shell commands, clipboard, notifications, cryptography, and email. |
| Graphics & Media | Drawing, image filters, charts, QR codes, PDF generation, audio playback, and synthesizers. |
| AI & Vision | AI text generation with Apple Intelligence, image recognition, and computer vision. |
Clicking any example creates a new project pre-filled with the example code. You can run it immediately or modify it to experiment with the language.
Projects
Neuridion projects use the .neuridion file extension and are implemented as macOS packages — folders that appear as a single file in Finder. This keeps all project files neatly bundled together.
Project Structure
Inside a .neuridion package, you will find the following structure:
MyProject.neuridion/
  Neuridion.project       // Project configuration (JSON)
  Main.code               // Main entry point
  Helper.code             // Additional source files
  Logs/                   // Log files (auto-created)
    app.log               // Application log
claude.log // AI chat log (if enabled)Neuridion.project— A JSON configuration file that stores project metadata, IDE state (open tabs, active tab), and user-editable settings like program name and log level.Main.code— The main source file and entry point of your program. Execution always starts here.- Additional
.codefiles — You can create as many source files as needed. Subfolders are also supported for organizing larger projects. Logs/— Automatically created directory containingapp.log(program log output) and optionallyclaude.log(AI chat transcript). Log files auto-rotate at 500 KB.
Creating a New Project
There are two ways to create a new project:
- Click New Project on the Welcome screen.
- Use the menu: File > New Project (Cmd+Shift+N).
You will be asked to choose a save location and a name. The IDE creates the .neuridion package and opens it with a blank Main.code file.
Opening an Existing Project
Open a project by:
- Clicking Open Project on the Welcome screen.
- Using the menu: File > Open Project (Cmd+Shift+O).
- Double-clicking a
.neuridionfile in Finder.
.neuridion file while the IDE is not running, the project opens in runtime mode — a simplified view that runs the program immediately without the full IDE interface. If the IDE is already running, the project opens normally as an IDE project.
Adding Source Files
To add a new source file to your project, use File > New File (Cmd+N). The new .code file is created inside the project package and appears in the file navigator. You can also create files in subfolders to organize your code.
The Main Window
The main IDE window is where you spend most of your time. It is divided into several areas, each serving a distinct purpose.
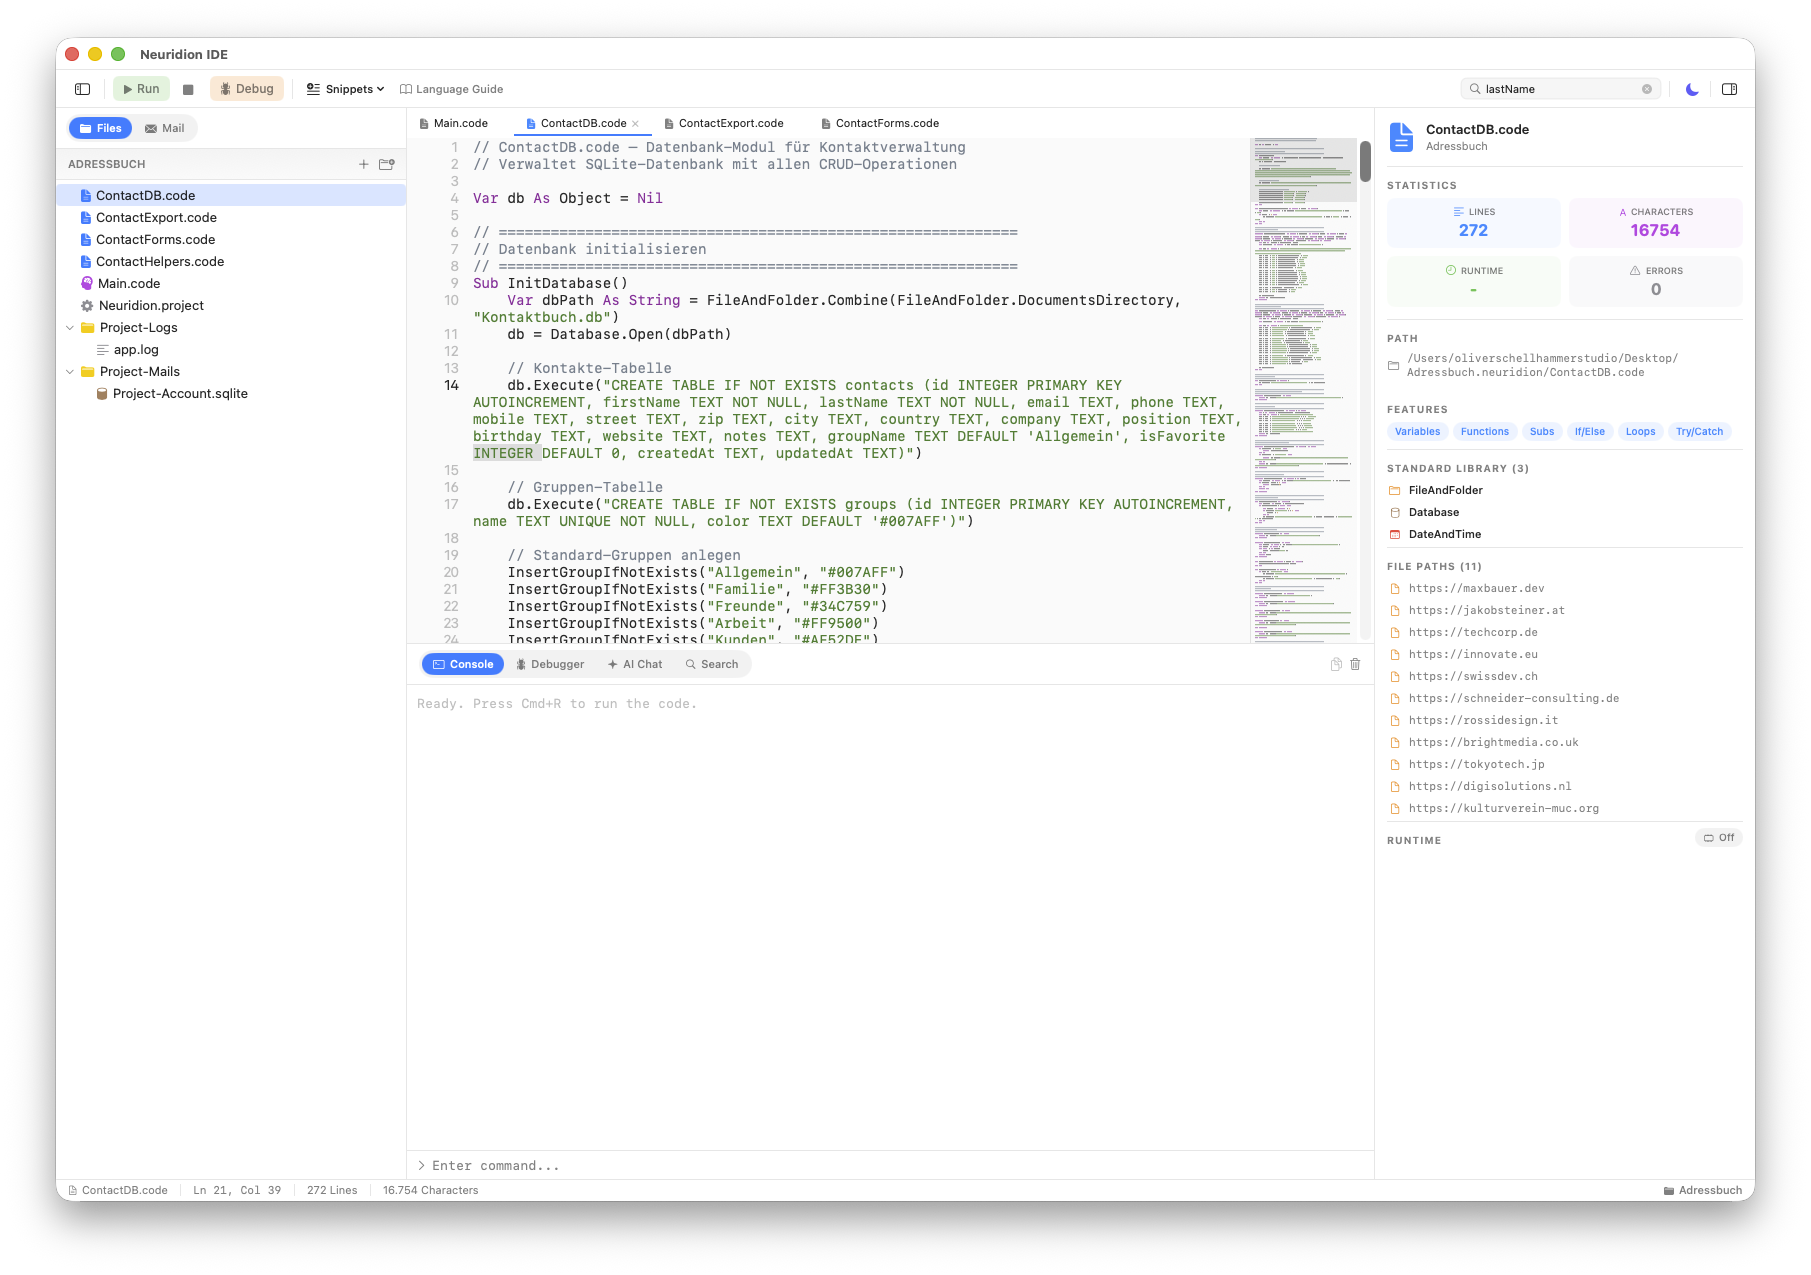
Layout
- Toolbar (top) — Contains the Run/Stop buttons, the interpreter/compiled mode toggle, and the search field. The project name is displayed in the center.
- Navigator (left sidebar) — Displays either the file tree or the mail inbox, selectable via capsule tabs at the top. The file navigator shows all
.codefiles in your project with a hierarchical folder structure. - Editor (center) — The code editor with a tab bar for switching between open files. Supports syntax highlighting, line numbers, and a minimap.
- Inspector (right sidebar) — An optional panel that can be toggled with Cmd+Shift+I.
- Bottom Panel — Houses the Console, Debugger, and AI Chat panels. Toggle visibility with the corresponding keyboard shortcuts or toolbar buttons.
You can show or hide individual panels to customize the layout for your workflow. The navigator, inspector, and bottom panels all remember their visibility state.
Writing Code
The code editor is the central component of Neuridion IDE. It provides a comfortable writing experience tailored to the Neuridion programming language.
Syntax Highlighting
The editor automatically highlights Neuridion source code with distinct colors for different elements:
- Keywords — Language keywords like
If,For,While,Function,Class,Var, andReturn. - Strings — String literals enclosed in double quotes.
- Numbers — Integer and decimal number literals.
- Comments — Single-line comments starting with
//. - Types — Type names like
Integer,Double,String,Boolean, andObject. - Functions — Function and method calls.
Editor Features
- Line Numbers — Displayed along the left gutter. Click a line number to set a breakpoint.
- Auto-Indentation — The editor automatically indents new lines based on the current block structure.
- Minimap — A condensed overview of your file shown on the right edge of the editor, useful for quick navigation in longer files.
- Tab Bar — Open multiple files simultaneously and switch between them using the tab bar above the editor. Unsaved changes are indicated with a dot on the tab.
Example Code
Here is a simple Neuridion program demonstrating basic syntax:
// A simple greeting program
Var name As String = "World"
Var count As Integer = 3

For i = 1 To count
    Print("Hello, " + name + "! (" + i.ToString() + ")")
End ForIf, if, or IF — they are all equivalent. The conventional style uses PascalCase for keywords.
Running Programs
Neuridion IDE makes it easy to run your programs directly from the editor.
Starting a Run
To run your program, use one of these methods:
- Click the Run button in the toolbar.
- Press Cmd+R.
- Use the menu: Run > Run.
The program executes starting from the Main.code file. Output is displayed in the console panel at the bottom of the window. The console opens automatically when you run a program.
Stopping a Run
To stop a running program:
- Click the Stop button in the toolbar.
- Press Cmd+. (Cmd+Period).
Execution Modes
The toolbar includes a toggle to switch between two execution modes:
- Interpreter — Executes your code using a tree-walking interpreter. This is the default mode and provides detailed error messages with line numbers and code context.
- Compiled — An alternative execution mode available via the animated toggle in the toolbar.
The Console
The console panel is located at the bottom of the main window and serves as the primary output area for your programs. Toggle it with Cmd+Shift+C.

Color-Coded Output
The console uses color coding to help you quickly identify different types of output:
| Prefix / Pattern | Color | Purpose |
|---|---|---|
[ERROR] | Red | Error messages |
[WARN] | Orange | Warning messages |
[INFO] | Blue | Informational messages |
[DEBUG] | Gray | Debug messages |
--- | Green | Section separators |
> | Teal | Input prompts |
Regular output from Print() statements appears in the default text color.
Interactive Input
When your program calls Console.ReadLine(), an input field appears at the bottom of the console. Type your response and press Enter to submit the value to the running program.
Print("What is your name?")
Var name As String = Console.ReadLine()
Print("Hello, " + name + "!")
Console Controls
- Copy Button — Copies the entire console output to the clipboard.
- Clear Console — Use Cmd+K to clear all console output.
Print("[INFO] Server started on port 8080") will appear in blue.
Debugging
Neuridion IDE includes a full-featured debugger that lets you pause execution, step through code line by line, and inspect variable values.
Setting Breakpoints
Click on a line number in the editor gutter to toggle a breakpoint on that line. Breakpoints are shown as colored indicators. When the program reaches a breakpoint during a debug run, execution pauses at that line.
Starting a Debug Run
To run your program with the debugger attached:
- Press Cmd+Shift+R.
- Use the menu: Run > Run & Debug.
The debugger panel opens at the bottom of the window, showing the current execution state.
Stepping Through Code
When execution is paused at a breakpoint, use the stepping controls:
- Step Over — Execute the current line and move to the next line. If the line contains a function call, the function executes completely without pausing inside it.
- Step Into — If the current line contains a function call, step into the function body and pause at the first line inside it.
- Step Out — Continue execution until the current function returns, then pause at the line after the function call.
- Continue — Resume execution until the next breakpoint is hit or the program ends.
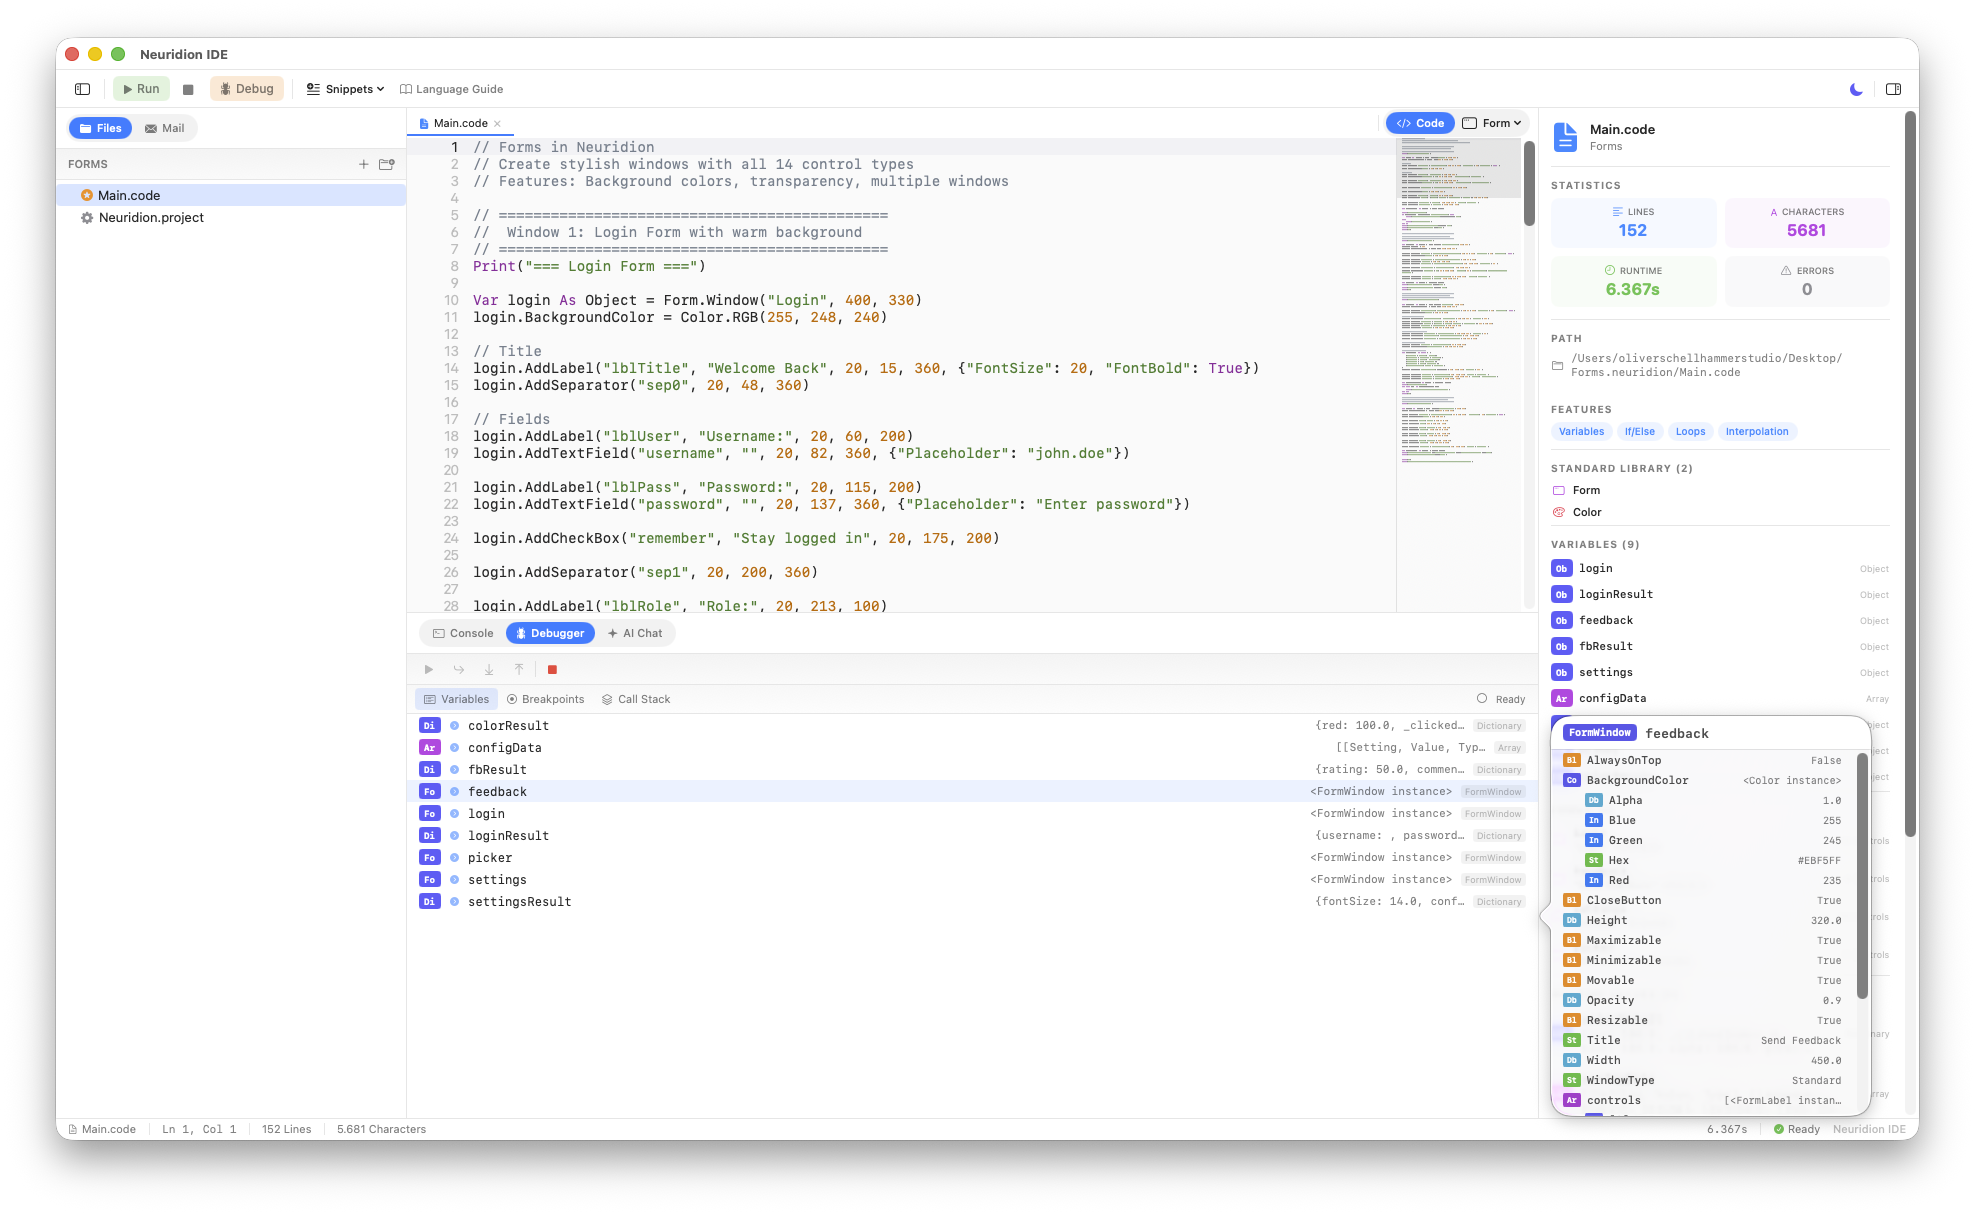
Variable Inspector
While paused, the variable inspector displays all variables in the current scope along with their current values. You can drill down into complex values like arrays, dictionaries, and objects to inspect their contents.
The inspector shows the actual NeuridionValue for each variable, including:
- Primitive values (strings, integers, doubles, booleans)
- Arrays with indexed elements
- Dictionaries with key-value pairs
- Objects with their properties and methods
AI Chat
Neuridion IDE includes a built-in AI assistant powered by Claude, accessible via the AI Chat panel at the bottom of the window.
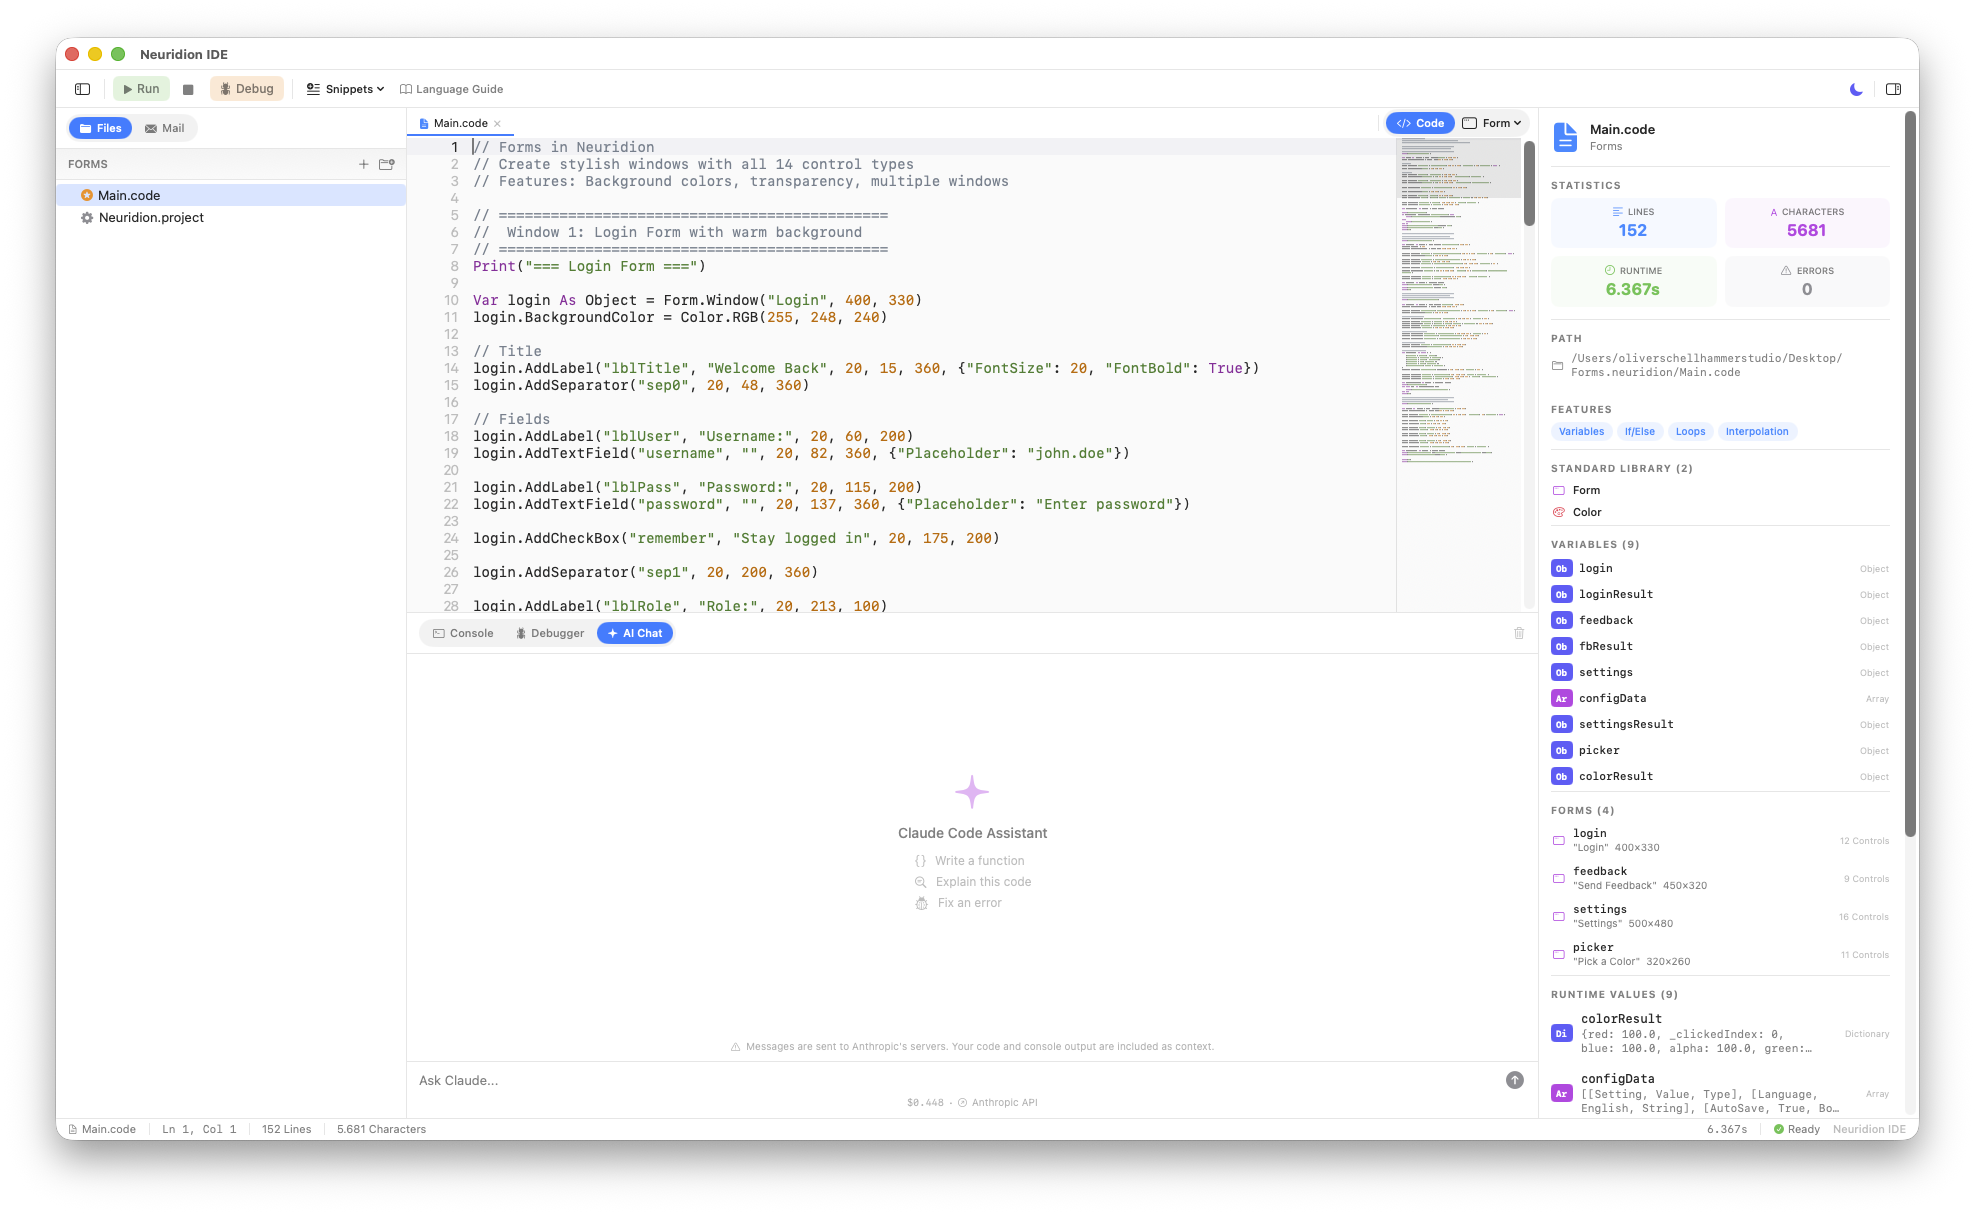
What You Can Do
- Ask questions about the Neuridion language, its syntax, and the standard library.
- Generate code — Describe what you want and the AI writes Neuridion code for you.
- Debug errors — Paste an error message and ask the AI to explain what went wrong and how to fix it.
- Learn concepts — Ask the AI to explain programming concepts using Neuridion examples.
Opening AI Chat
Open the AI Chat panel with Cmd+L or via the menu. The panel appears at the bottom of the main window alongside the console and debugger tabs.
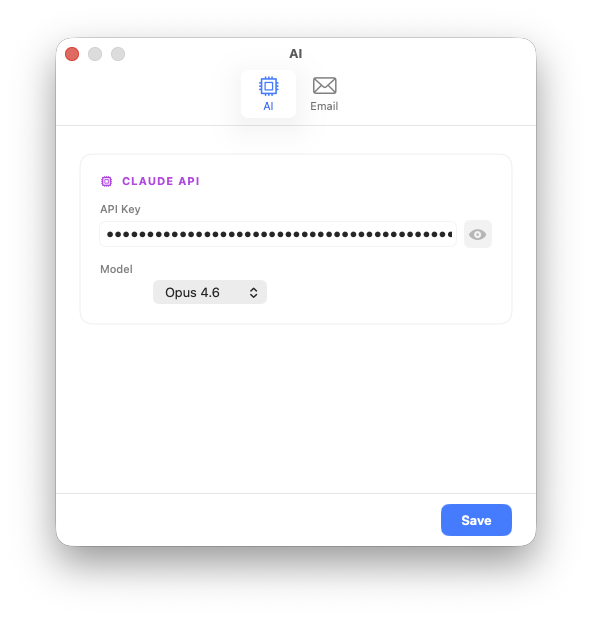
Configuration
The AI assistant requires a Claude API key. To configure it:
- Open Settings (Cmd+,).
- Go to the AI tab.
- Enter your API key and select a model.
Your API key is stored securely using AES-GCM encryption in the application settings.
Chat Logging
If enabled in project settings (Cmd+Shift+,), AI chat interactions are logged to Logs/claude.log inside your project package. This can be useful for reviewing past conversations or tracking how the AI helped during development.
Project Search
Neuridion IDE provides search functionality to help you find text across your project.
Find & Replace
Press Cmd+F to open the find and replace bar in the current editor. It supports:
- Searching for text in the currently active file.
- Replacing individual occurrences or all occurrences at once.
- Navigating between matches with the forward and backward buttons.
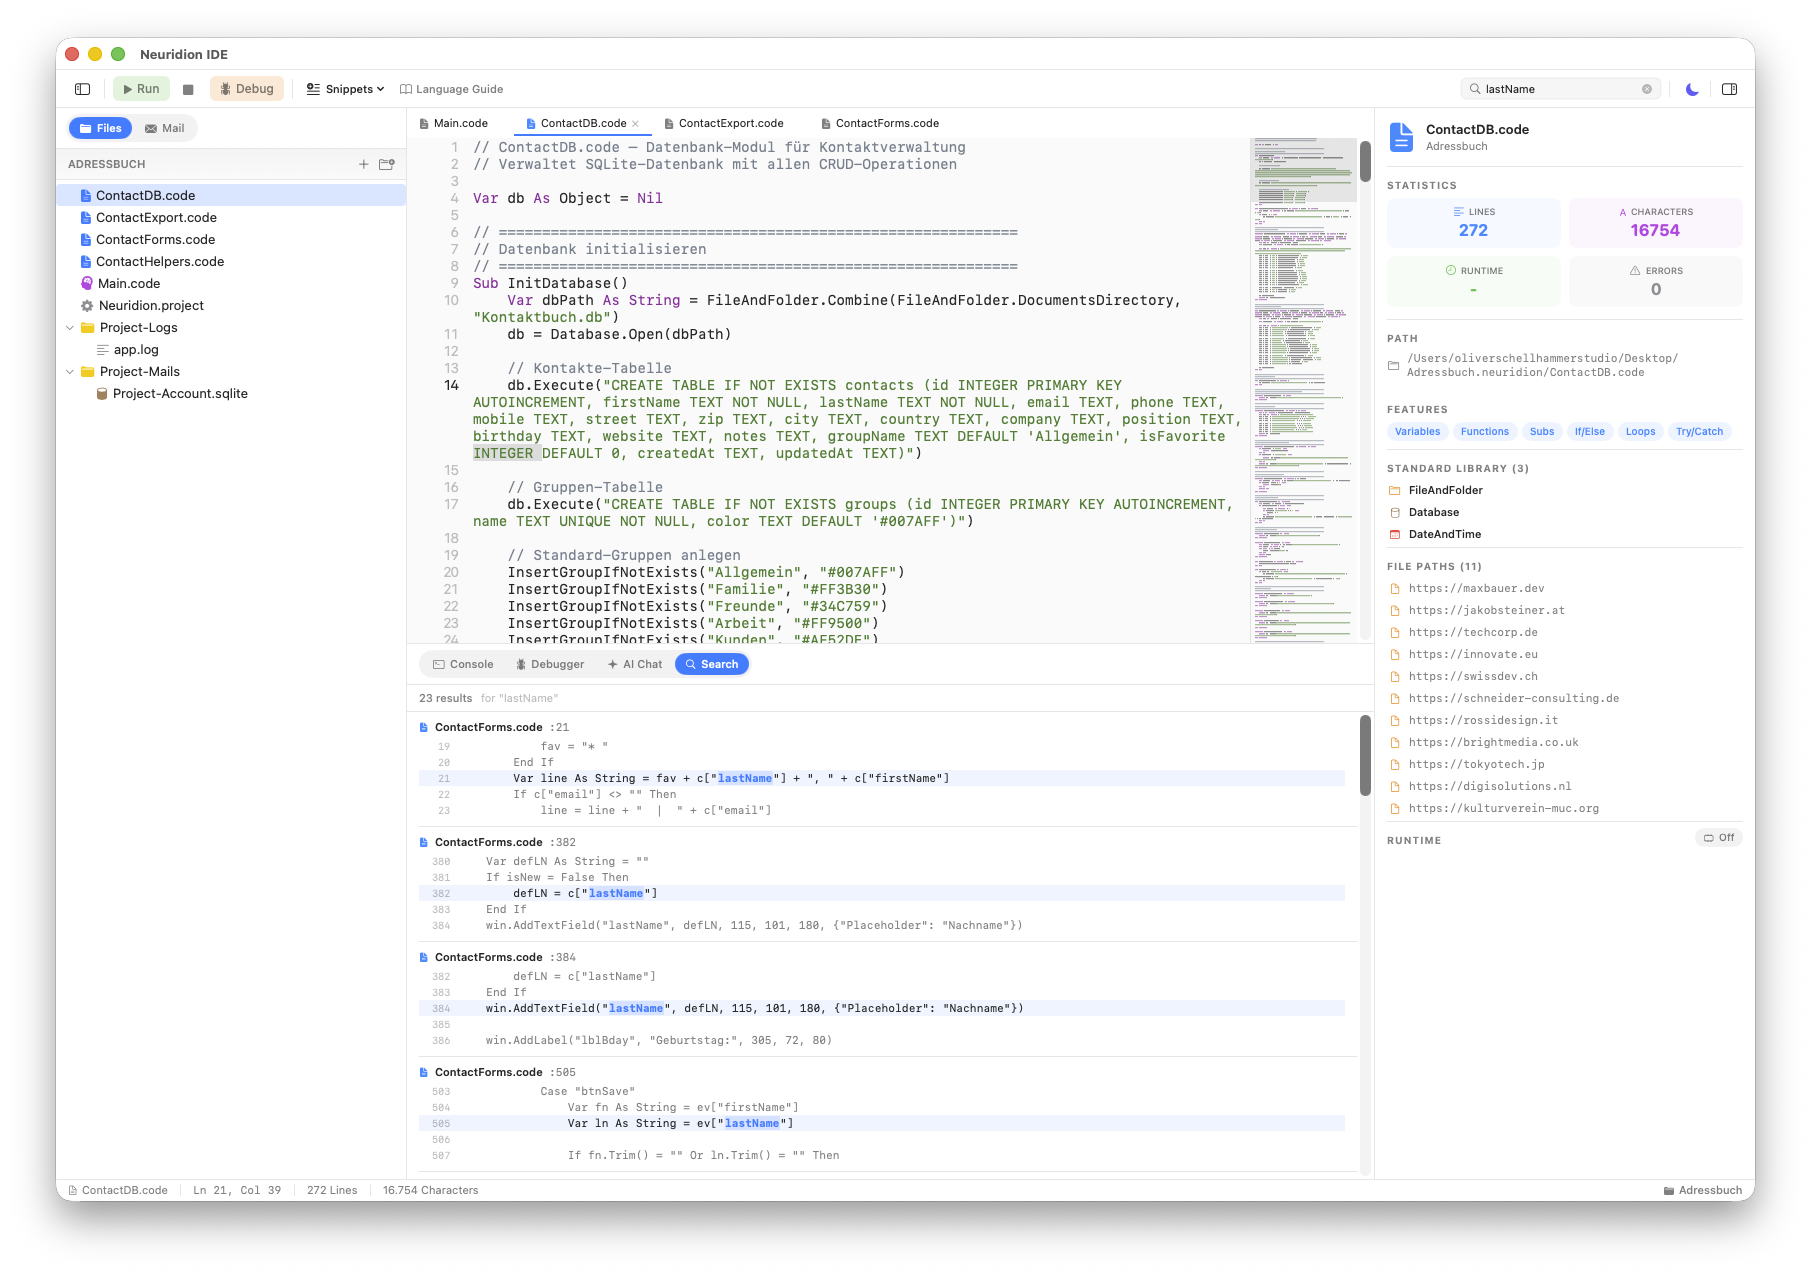
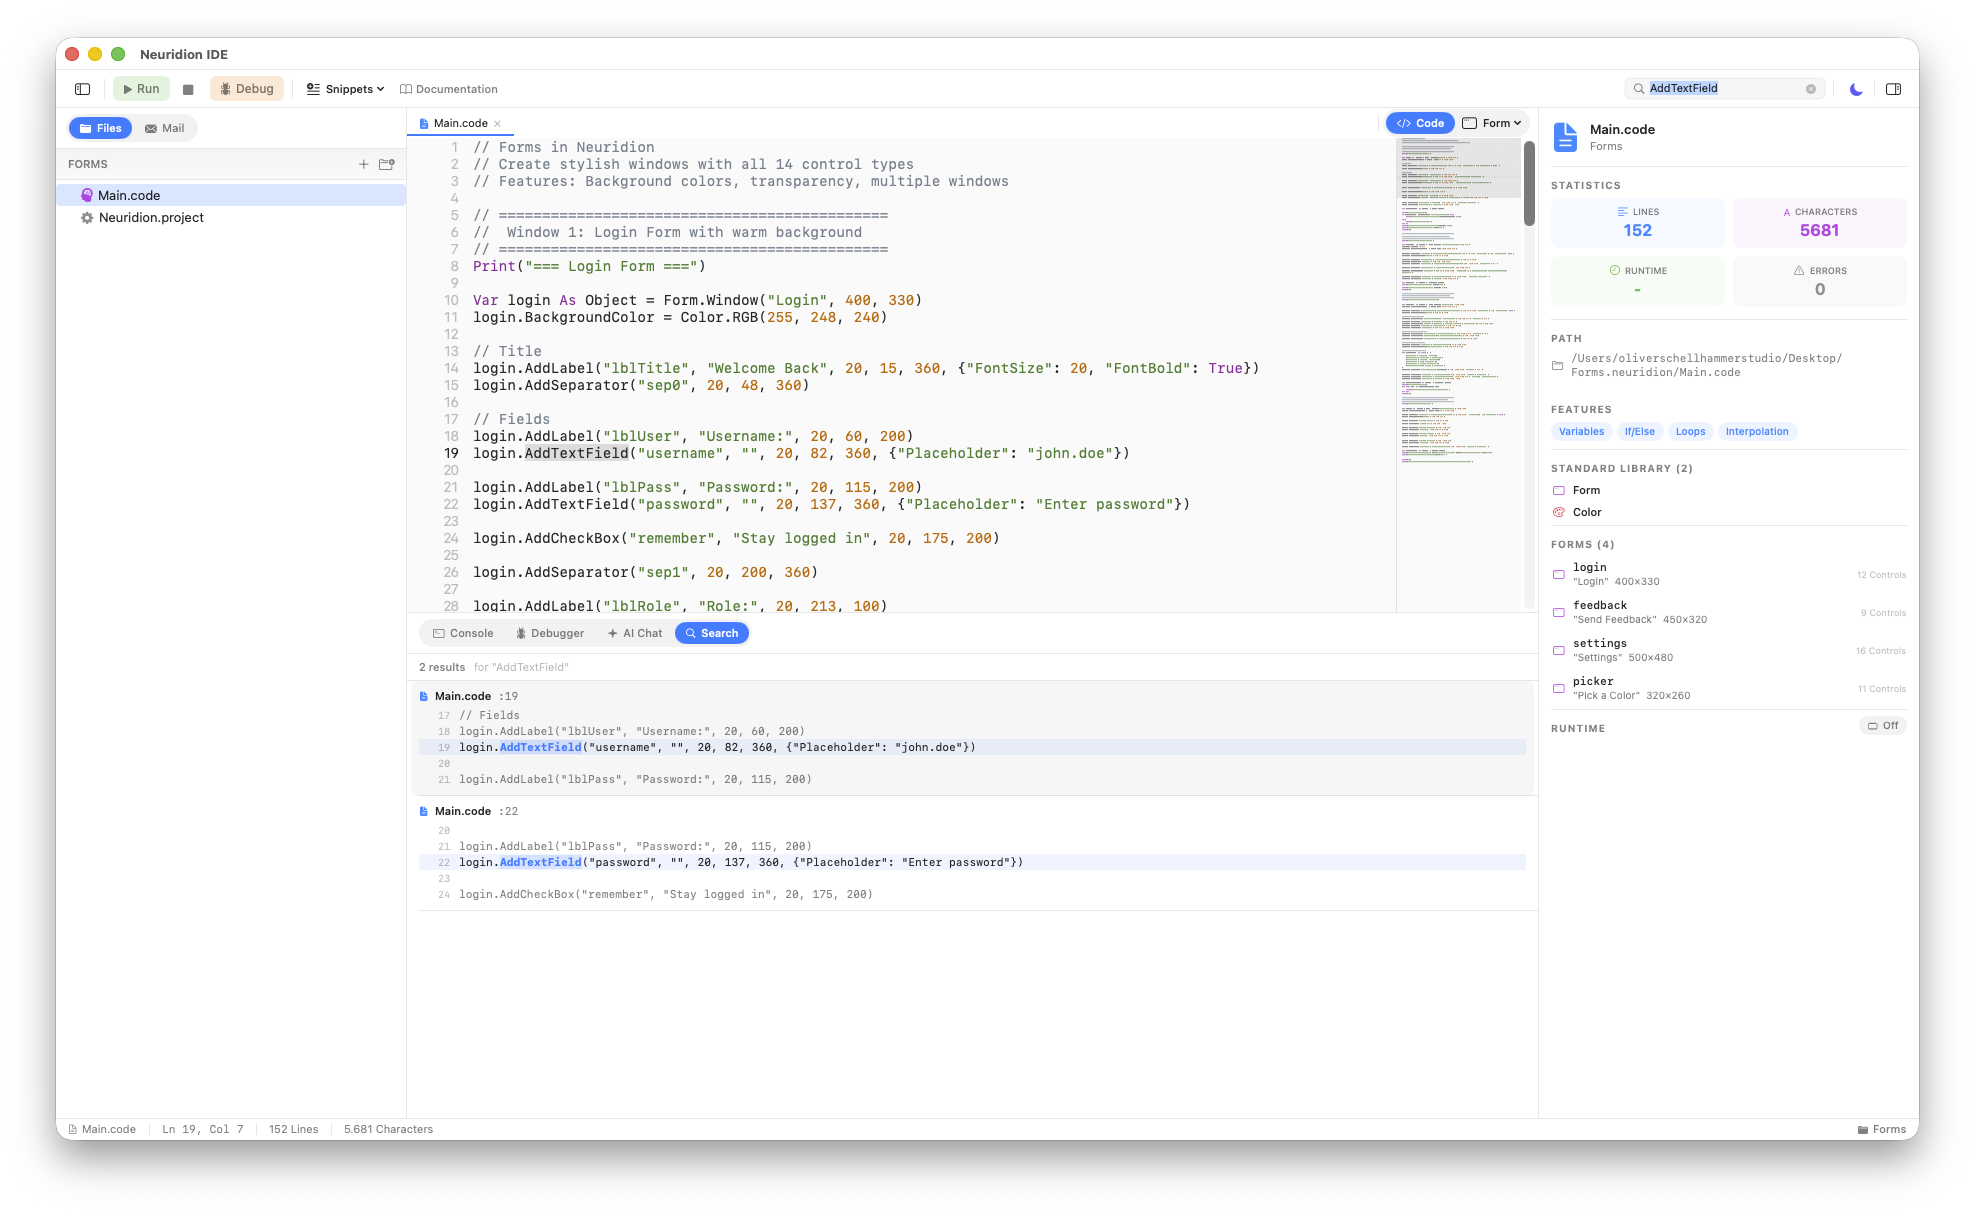
Project-Wide Search
The search field in the toolbar allows you to search across all files in your project. Results are displayed with file names and line numbers, letting you jump directly to the matching location.
Form Designer
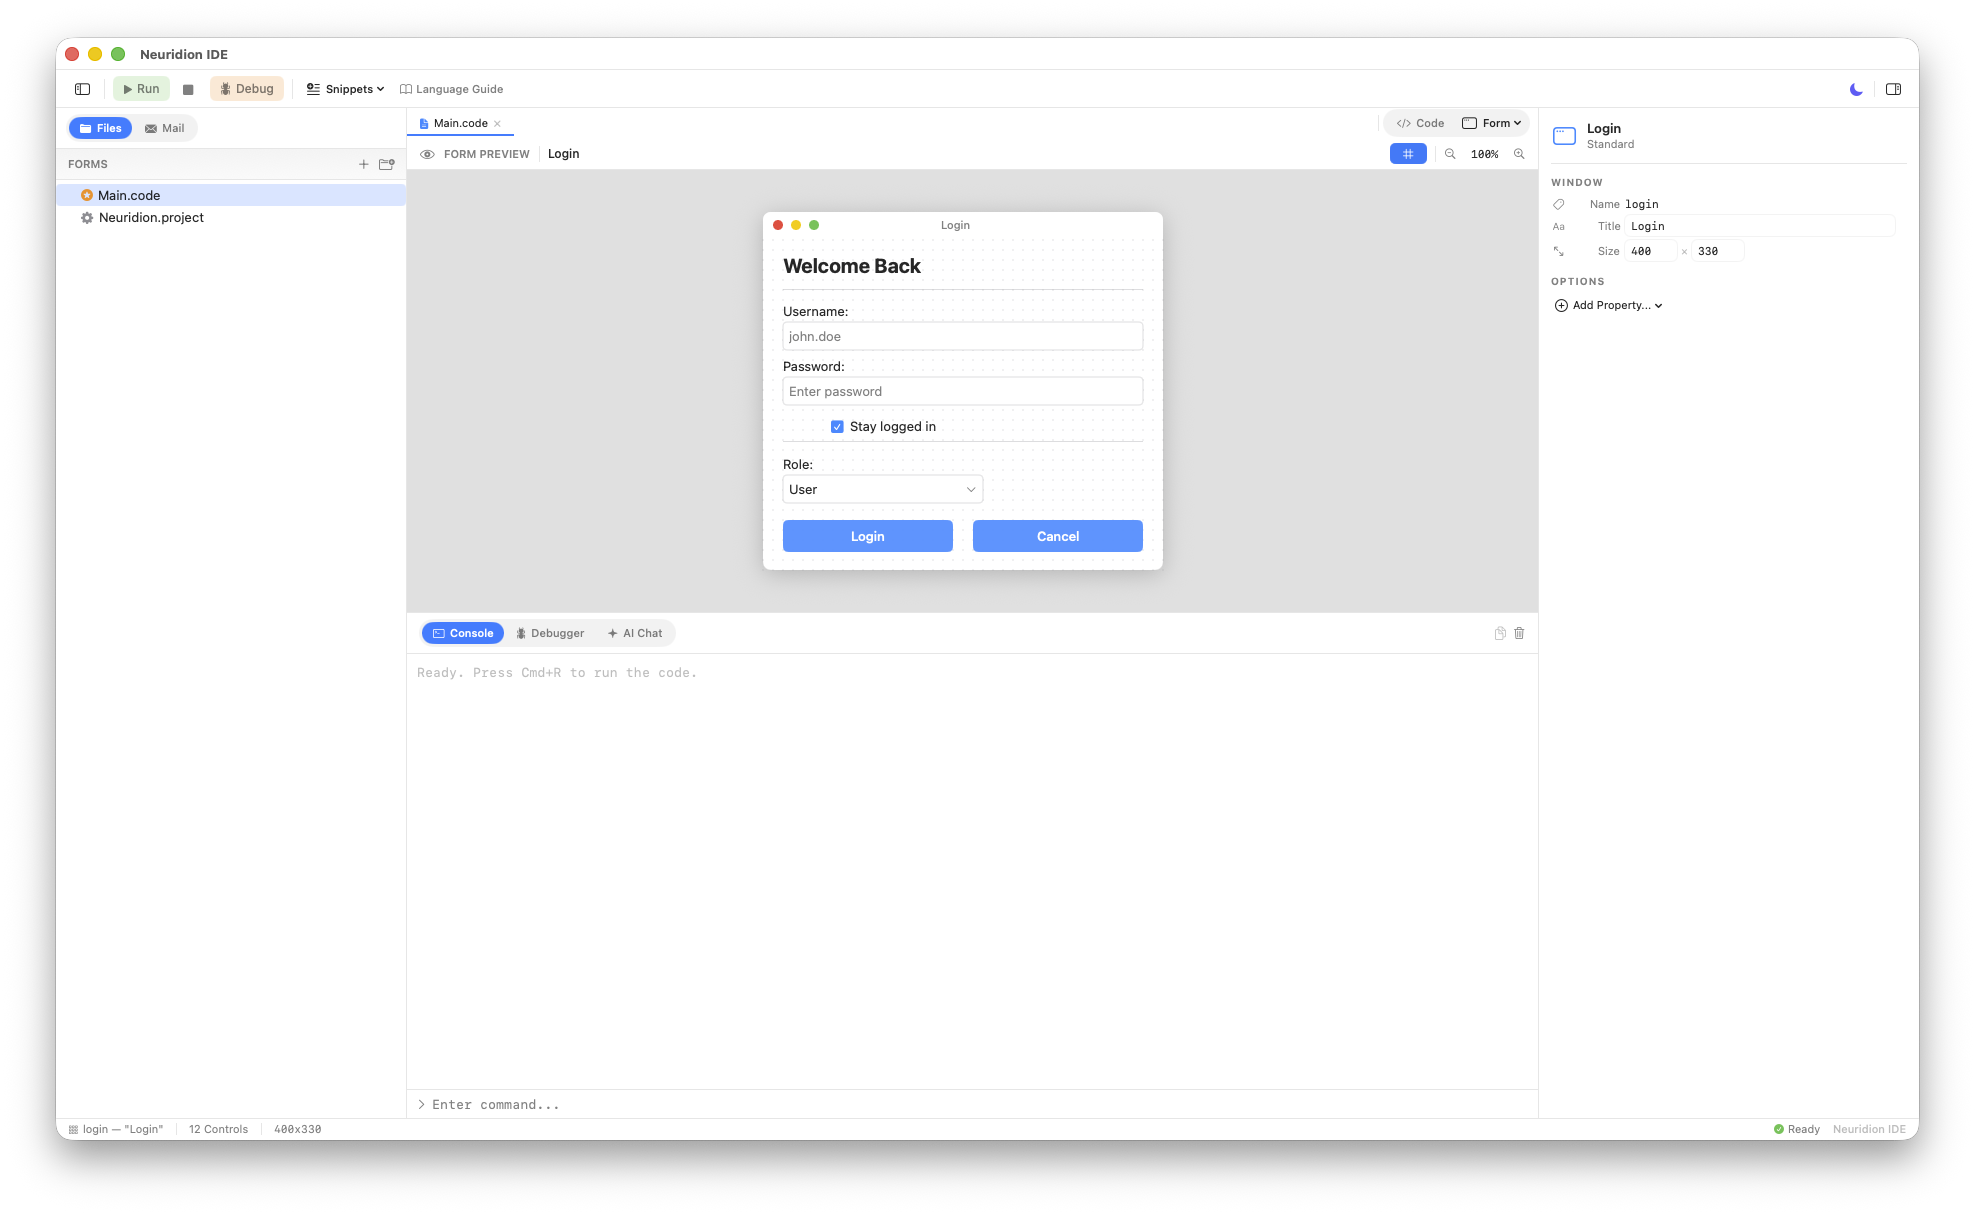
Neuridion supports creating graphical user interfaces with the Form module. The IDE includes a visual preview feature called the Form Designer that shows you what your form will look like without running the program.

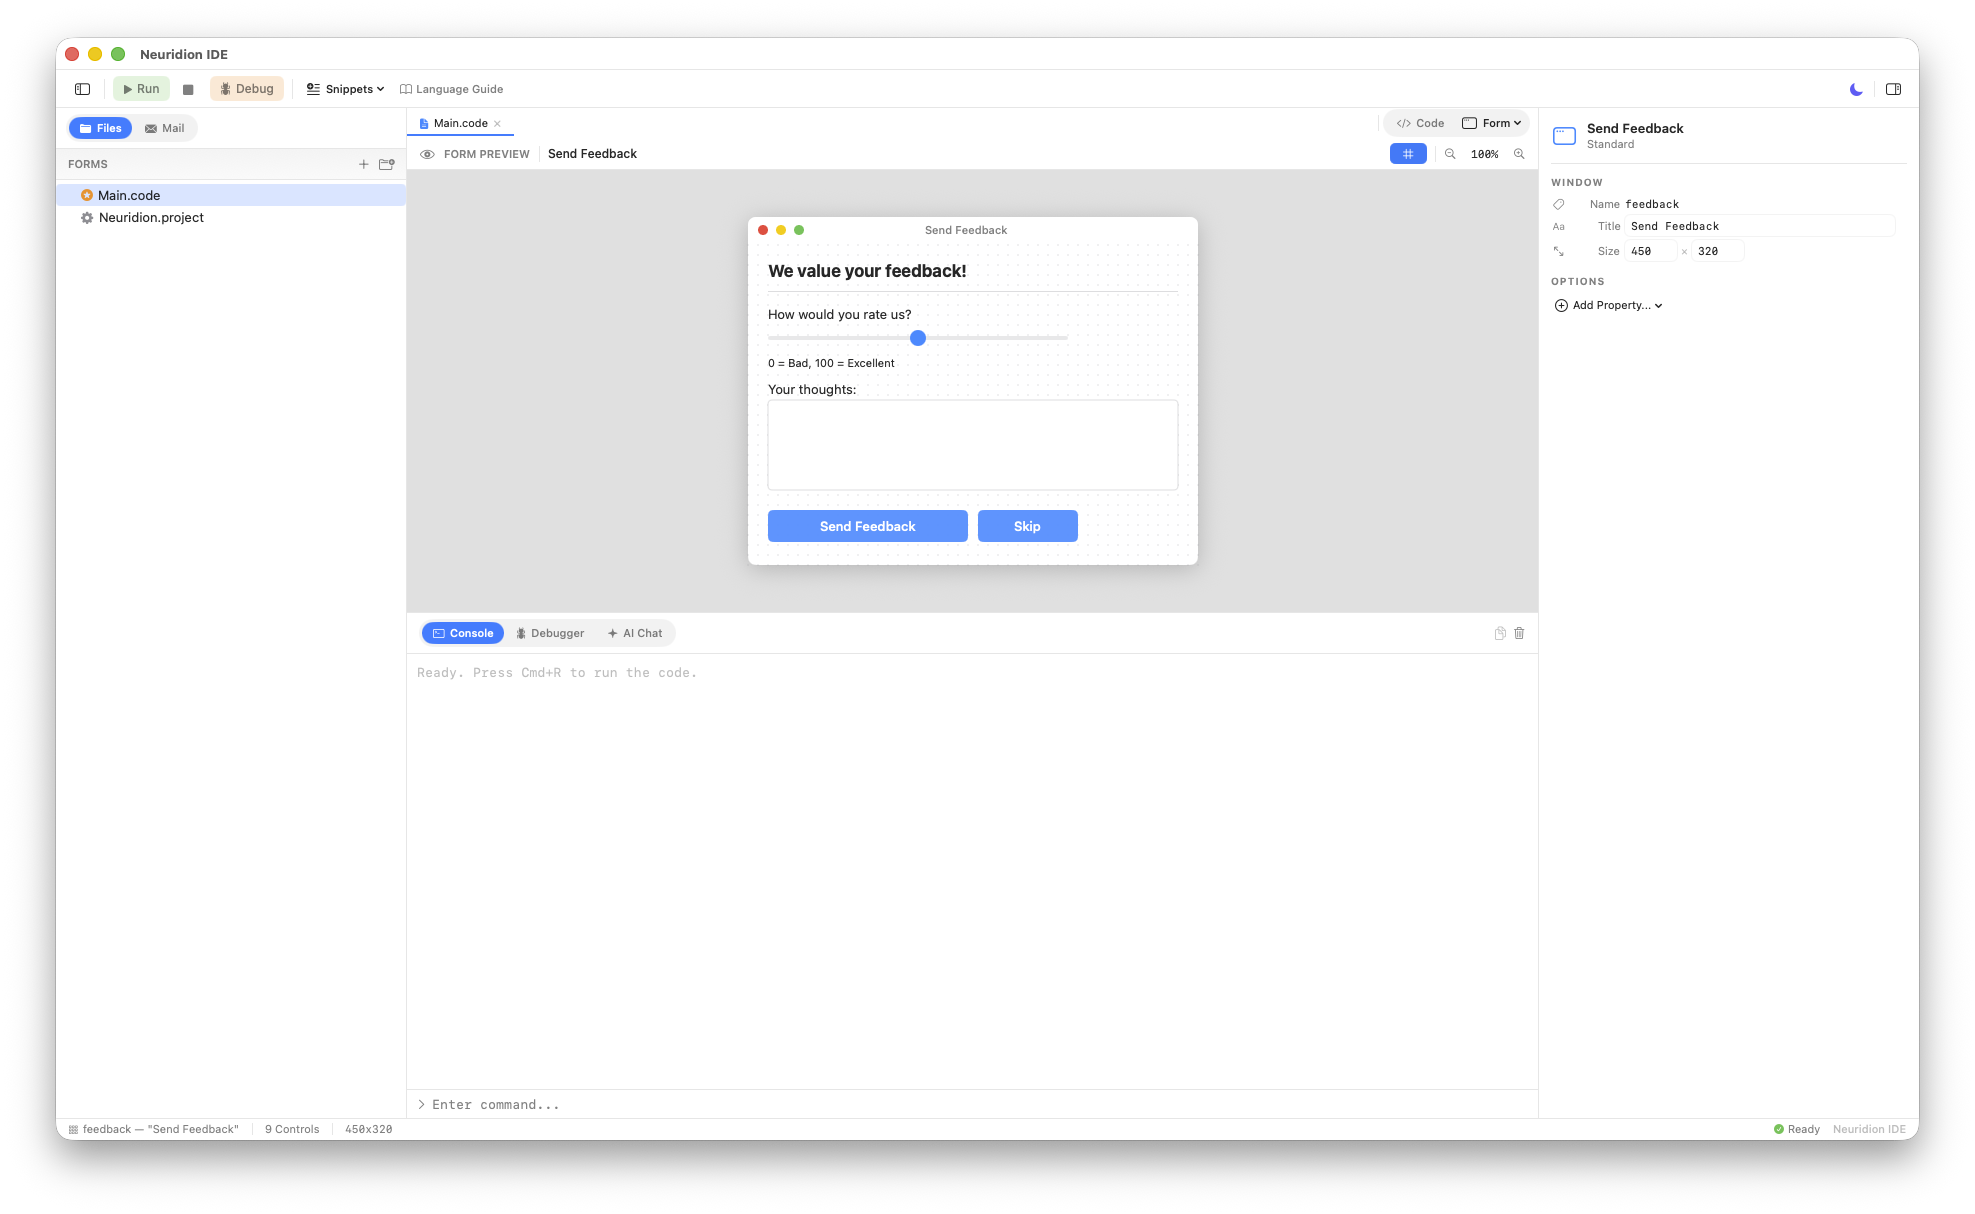
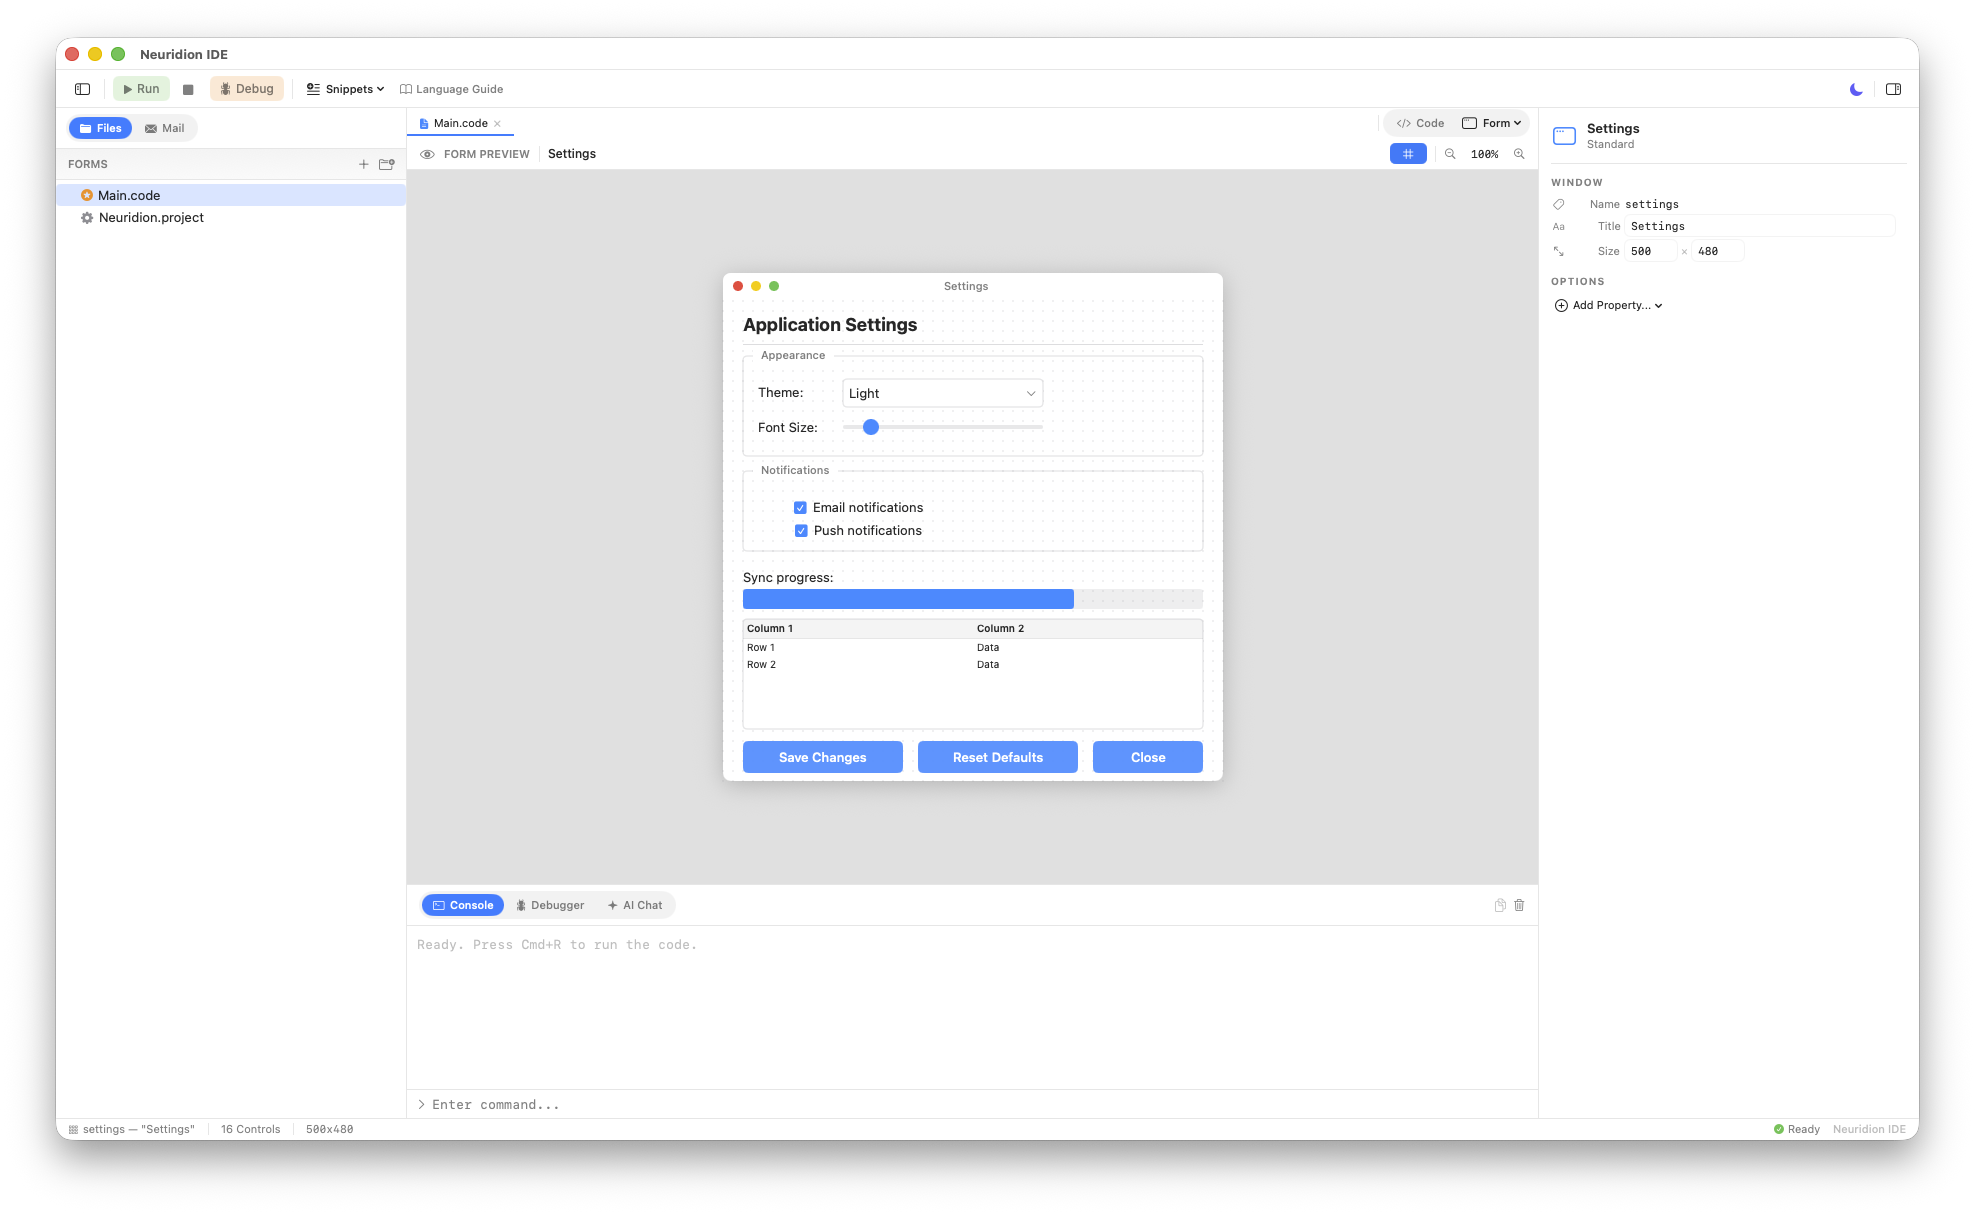
Here are some examples of forms created with the Form module:


How It Works
When a .code file contains a Form.Window(...) call, a Code / Form toggle appears in the tab bar for that file. Click Form to switch to the visual preview.
The Form Designer parses your source code and renders a read-only preview of the window layout, showing all controls at their specified positions and sizes. This includes:
- Labels, buttons, text fields, and text areas
- Check boxes, radio buttons, combo boxes, and list boxes
- Progress bars, sliders, and image views
- Group boxes, separators, and tables
Example Form Code
Var win As Object = Form.Window("Login", 400, 250)

win.AddLabel("lblUser", "Username:", 20, 20, 100)
win.AddTextField("txtUser", "", 130, 20, 240)

win.AddLabel("lblPass", "Password:", 20, 60, 100)
win.AddTextField("txtPass", "", 130, 60, 240)

win.AddButton("btnLogin", "Log In", 130, 120, 120, {"Style": "Primary"})

Var result As Object = win.Show()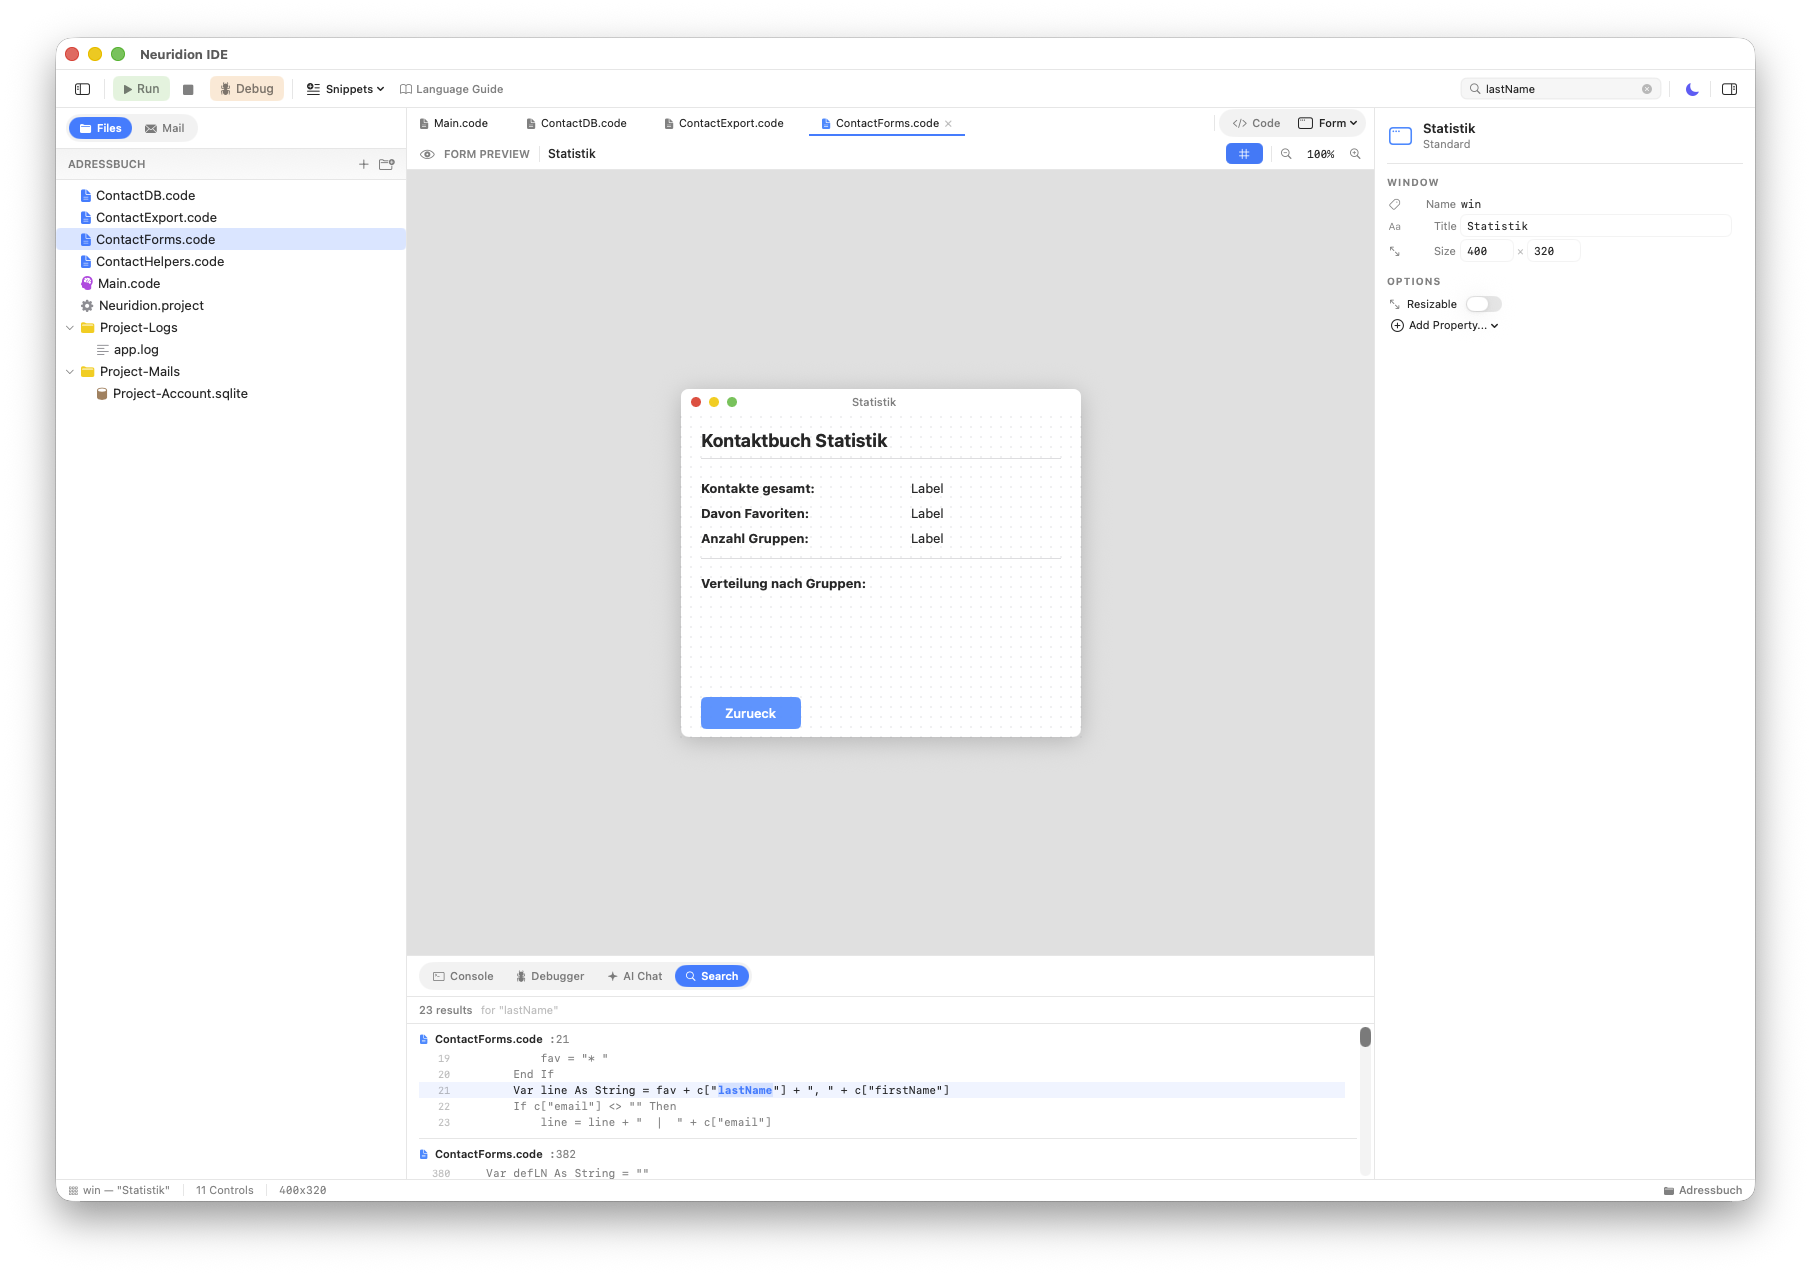
Add*(name, content, x, y, width [, {options}]).
Mail Inbox
Neuridion IDE includes a built-in IMAP mail inbox viewer, accessible directly from the navigator sidebar. This is especially useful for projects that send or process emails, as you can check incoming messages without leaving the IDE.
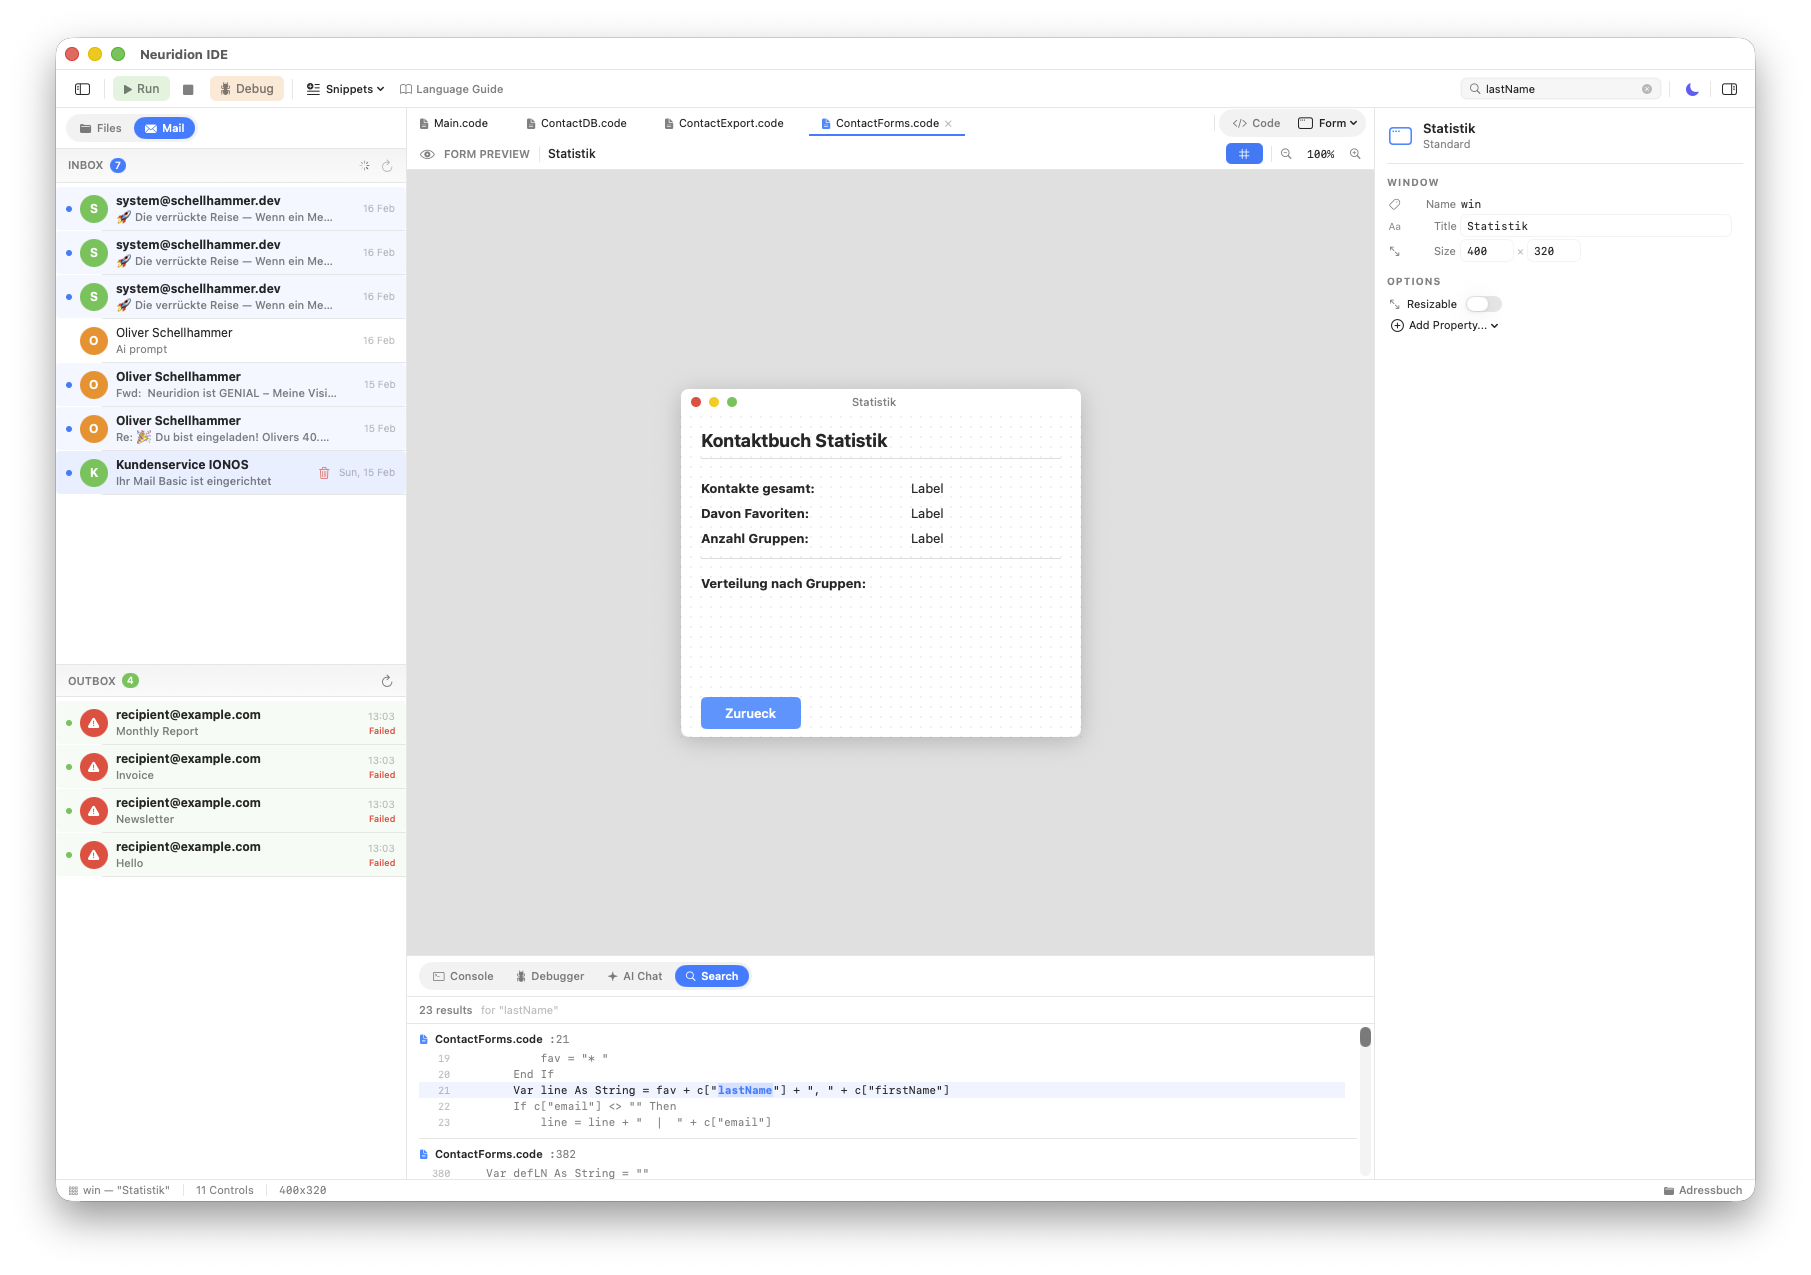
Accessing the Inbox
In the navigator sidebar (left panel), you will see capsule-shaped tabs at the top: Files and Mail. Click Mail to switch from the file tree to the mail inbox view.
Features
- Message List — Displays your inbox messages with sender, subject, and date.
- Expandable Messages — Click a message to expand it and read the full content.
- Technical Details — View email headers, Message-ID, Received chain, and raw message source for debugging email-related code.
- Auto-Refresh — The inbox automatically refreshes every 60 seconds to check for new messages.
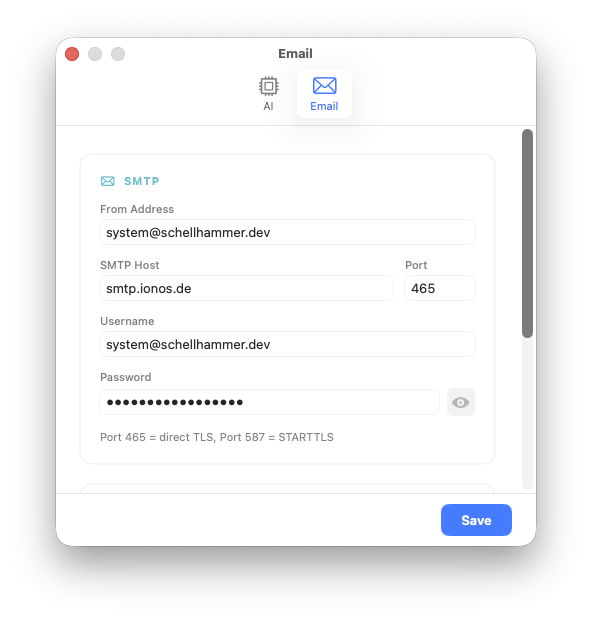
Configuration
The mail inbox requires IMAP credentials to connect to your email server. Configure these in the app settings:
- Open Settings (Cmd+,).
- Go to the Email tab.
- Enter your IMAP host, port, username, and password.
Credentials are stored securely with AES-GCM encryption. The mail inbox is read-only — you can view messages but not send, delete, or modify them from the inbox view.
Settings
Neuridion IDE has two levels of settings: application-wide settings and per-project settings.
App Settings (Cmd+,)
Open the application settings via the menu Neuridion IDE > Settings or with Cmd+,. The settings window has two tabs:
AI Tab
- API Key — Your Claude API key for the AI assistant. Required for the AI Chat feature to work.
- Model — Select which Claude model to use for code generation and chat responses.
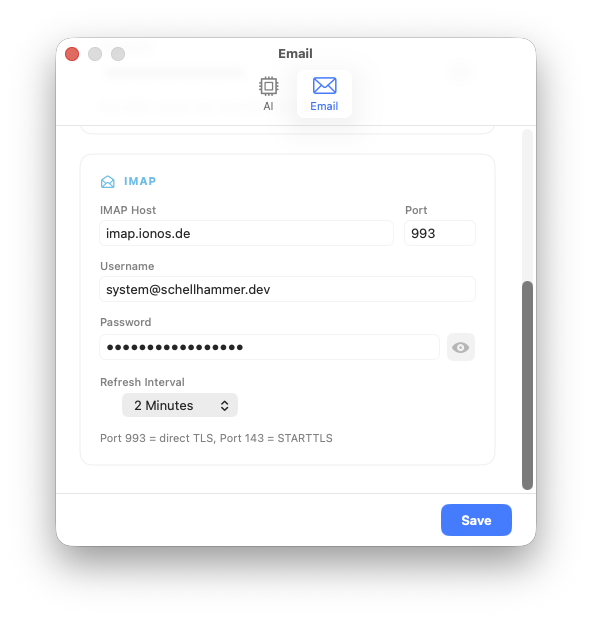
Email Tab
- SMTP Settings — Host, port, username, and password for sending emails via the
Emailmodule. - IMAP Settings — Host, port, username, and password for the mail inbox viewer and the
Email.IMAP()function.
All sensitive fields (API keys, passwords) are stored using AES-GCM encryption in ~/Library/Application Support/Neuridion IDE/AppSettings.json.
Project Settings (Cmd+Shift+,)
Each project has its own settings stored in the Neuridion.project file inside the project package. Open project settings with Cmd+Shift+,. Available options:
- Program Name — A display name for your project, shown in the toolbar.
- Log Level — Controls the verbosity of logging: debug, info, warning, or error. Lower levels include all messages from higher levels.
- Enable Claude Log — When enabled, AI chat interactions are saved to
Logs/claude.loginside the project.
Keyboard Shortcuts
Neuridion IDE provides keyboard shortcuts for common actions. Here is the complete list:
Files
| Shortcut | Action |
|---|---|
Cmd+N | New File |
Cmd+Shift+N | New Project |
Cmd+O | Open File |
Cmd+Shift+O | Open Project |
Cmd+S | Save |
Cmd+Shift+S | Save As |
Running & Debugging
| Shortcut | Action |
|---|---|
Cmd+R | Run |
Cmd+Shift+R | Run & Debug |
Cmd+. | Stop |
Panels & Navigation
| Shortcut | Action |
|---|---|
Cmd+1 | Toggle Navigator |
Cmd+Shift+C | Show Console |
Cmd+Shift+D | Show Debugger |
Cmd+Shift+I | Toggle Inspector |
Cmd+L | Show AI Chat |
Editing & Search
| Shortcut | Action |
|---|---|
Cmd+F | Find & Replace |
Cmd+K | Clear Console |
Settings
| Shortcut | Action |
|---|---|
Cmd+, | App Settings |
Cmd+Shift+, | Project Settings |