Teacher's Guide to Neuridion
A practical guide for educators who want to teach kids to code — no prior programming experience required.
This guide is designed for teachers, tutors, parents, and anyone who wants to introduce children (ages 8–16) to programming. You don't need to be a programmer yourself — Neuridion was built to be understandable by anyone who can read English.
Why Teach Programming?
Programming is more than writing code. It teaches children how to think logically, solve problems step by step, and be creative within structure. These skills transfer to every subject and every career.
Programming = The New Literacy
Reading and writing were once skills reserved for scholars. Today, everyone reads and writes. Programming is going through the same transformation. Children who understand code will have a superpower in the modern world:
- Problem-solving — Breaking big problems into small, manageable steps
- Logical thinking — Understanding cause and effect, conditions, and sequences
- Creativity — Building things from nothing, expressing ideas through code
- Persistence — Learning that mistakes (bugs) are normal and fixable
- Confidence — The thrill of creating something that actually works
Why Start Young?
Children are natural learners. They explore, experiment, and aren't afraid to fail. These are exactly the qualities that make great programmers. The earlier they start, the more natural it feels — just like learning a language.
Why Neuridion?
There are many programming languages, but most weren't designed for beginners. Neuridion was built specifically to be readable, forgiving, and fun.
| Feature | Why It Matters |
|---|---|
| English-like syntax | Code reads like sentences: If score > 10 Then Print("Great!") |
| No cryptic symbols | No {}, ;, or -> — just plain words like End If |
| Built-in AI | Apple AI works on-device, no API key needed — instant wow factor |
| Graphics & Sound | Kids see and hear their code working — not just text output |
| 37 built-in modules | Graphics, charts, audio, crypto, network, AI, and more — ready to use |
| Runs on any Mac | No downloads, no installs, no configuration — just open and code |
| Complete IDE | Code editor, console, debugger, file management — all in one window |
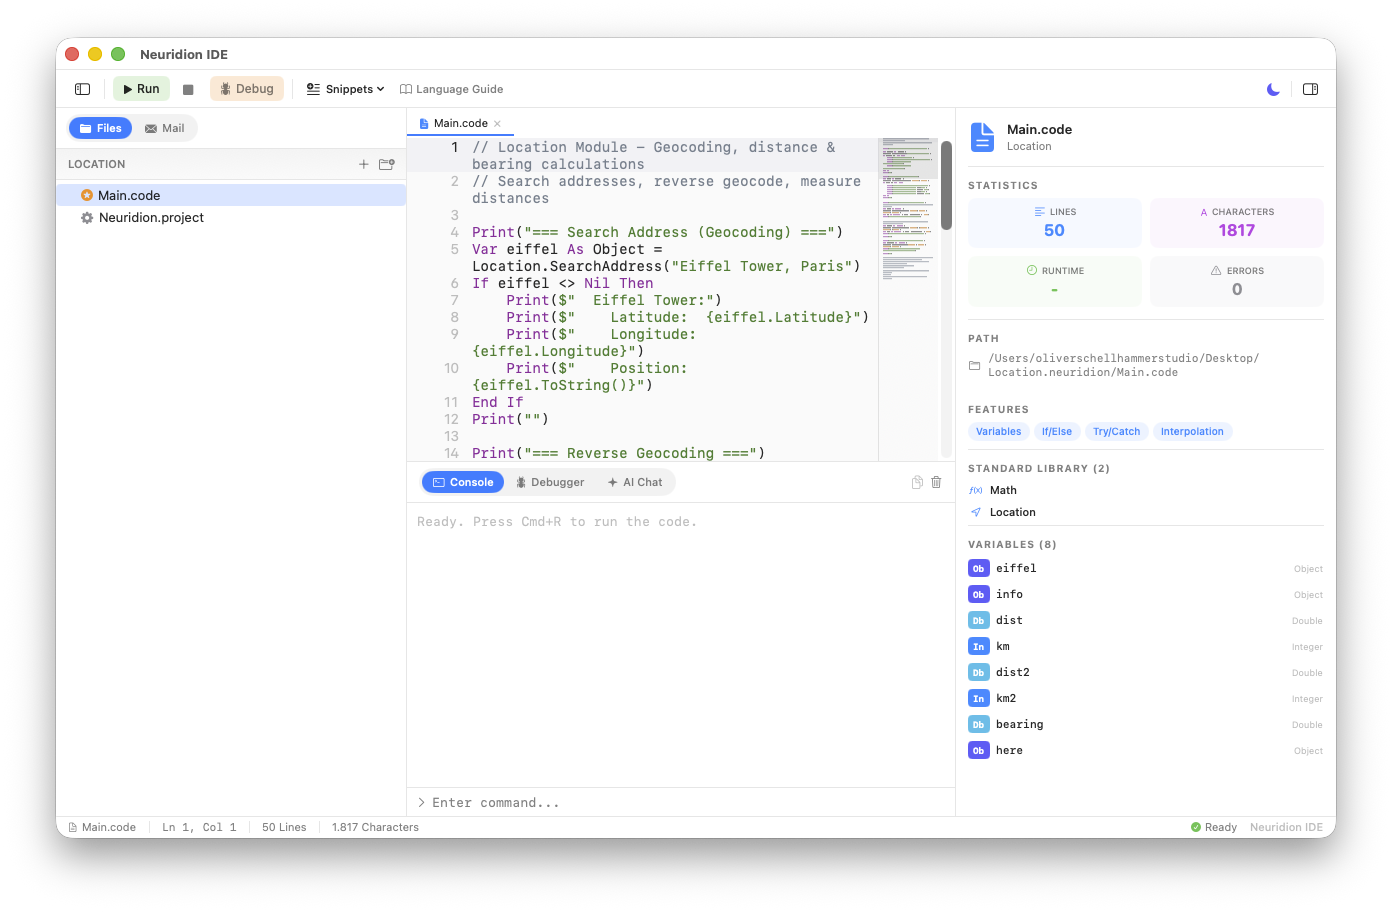
The Neuridion IDE: code editor, console output, file navigator, and code analysis — all in one window.
Getting Started
What You Need
- A Mac running macOS 26 or later
- Neuridion IDE installed (drag to Applications folder)
- That's it — no accounts, no internet connection required
Opening the IDE
- Launch Neuridion IDE from the Applications folder
- The Welcome screen shows three options: New Project, Open Project, and Documentation
- Below that, you'll see KIDS examples at the top of the examples list — these map directly to the 5 lessons in this guide
Using the Kids Examples
Each lesson in this guide has a matching example in the IDE. To use one:
- Click the example card (e.g., "Hello World" under KIDS)
- Choose where to save the project
- The code appears in the editor — click the Run button (green play icon) to execute it
- Output appears in the Console at the bottom

After clicking Run, output appears in the Console panel at the bottom of the IDE.
Lesson Plan: 5 Lessons to First Success
These five lessons are designed to be taught in order, each building on the previous one. Each lesson maps to a KIDS example in the IDE that students can use as a starting point.
The total teaching time is approximately 2–2.5 hours, which can be spread across multiple sessions.
Lesson 1: Hello World — First Success
Lesson Overview
Goal: Write and run the very first program. Experience the thrill of making the computer do something.
Key concepts: Print, strings, string interpolation, Console.ReadLine()
What Students Will Do
Start with the simplest possible program:
Print("Hello, World!")Then expand it to ask for the user's name and respond:
Print("What is your name?")
Var name As String = Console.ReadLine()
Print($"Hello, {name}! Welcome to programming!")
The full KIDS example also shows fun string operations: .Length, .ToUppercase(), .Reverse(), and a countdown loop.
What to Explain
Print()shows text on screen. The text goes inside quotes.Var name As Stringcreates a variable — a named box that holds data.Console.ReadLine()waits for the user to type something.$"Hello, {name}!"puts the variable's value inside the text (string interpolation).
Print lines. The goal is to feel ownership of the code within the first 5 minutes.
Lesson 2: Guessing Game — Variables & Logic
Lesson Overview
Goal: Create an interactive game where the computer picks a secret number and the player guesses it.
Key concepts: Variables (Integer), While loops, If/Else, Math.RandomInt(), comparison operators
How It Works
- The computer picks a random number between 1 and 100
- The player guesses; the program says "too high" or "too low"
- When correct, it shows how many tries it took
Key Code to Highlight
Var secret As Integer = Math.RandomInt(1, 100)

While guess <> secret
    Print("Enter your guess:")
    Var input As String = Console.ReadLine()
    guess = input.ToInteger()

    If guess < secret Then
        Print("Too LOW!")
    ElseIf guess > secret Then
        Print("Too HIGH!")
    End If
End While
What to Explain
While ... End Whilerepeats code as long as the condition is trueIf/ElseIf/End Ifmakes decisions based on conditions<>means "not equal to".ToInteger()converts text input to a number
Lesson 3: Math Quiz — Functions & Scoring
Lesson Overview
Goal: Build a quiz that asks random math questions, tracks the score, and gives feedback.
Key concepts: Function, Return, For loops, score tracking, Math.RandomInt()
How It Works
- The program generates 5 random addition/subtraction questions
- The student answers each one and gets immediate feedback
- At the end, it shows the total score with encouraging messages
Key Code to Highlight
Function AskQuestion(num As Integer) As Boolean
    Var a As Integer = Math.RandomInt(1, 50)
    Var b As Integer = Math.RandomInt(1, 50)
    // ... ask and check ...
    Return True   // or False
End Function

For i = 1 To 5
    Var correct As Boolean = AskQuestion(i)
    If correct Then score = score + 1
End For
What to Explain
- Functions are reusable blocks of code with a name. You call them like
AskQuestion(1). Returnsends a value back to whoever called the function.For i = 1 To 5counts from 1 to 5, running the code block each time.As Booleanmeans the function returnsTrueorFalse.
Lesson 4: AI Chat — Talk to Your Mac
Lesson Overview
Goal: Use Apple's on-device AI to generate text, translate languages, and have a conversation.
Key concepts: AI.Apple(), .Generate(), .Translate(), AI as a tool
How It Works
- The program creates an Apple AI instance (runs locally, no API key)
- It asks the AI a question, generates a short story, and translates text
- Then it enters an interactive chat mode where students can ask anything
Key Code to Highlight
Var apple As Object = AI.Apple()

Var answer As String = apple.Generate("What is the solar system?")
Print(answer)

Var french As String = apple.Translate("Hello!", "French")
Print(french)
What to Explain
AI.Apple()creates an AI assistant that runs on your Mac — private, no internet needed.Generate()asks the AI a question and gets a text response.Translate()translates text into any language- AI is a tool, not magic — it processes patterns in text
apple.IsAvailable() and shows a message if the device doesn't support it.
The IDE also has a built-in AI Chat panel where students can ask questions about their code.
Lesson 5: Drawing — Code as Art
Lesson Overview
Goal: Create a colorful scene (sky, sun, house, tree, flowers) using code-driven graphics.
Key concepts: Graphics.CreatePicture(), coordinates, colors (RGB), shapes, layering
How It Works
- Create a canvas with
Graphics.CreatePicture(width, height) - Set colors with
SetFillColor(red, green, blue)— each value 0–255 - Draw shapes:
FillRectangle,FillEllipse,DrawLine - Show the result with
pic.Show()
Key Code to Highlight
Var pic As Object = Graphics.CreatePicture(500, 400)

// Sky
pic.SetFillColor(135, 206, 250)
pic.Clear()

// Sun
pic.SetFillColor(255, 220, 50)
pic.FillEllipse(380, 20, 100, 100)

// Grass
pic.SetFillColor(76, 175, 80)
pic.FillRectangle(0, 280, 500, 120)

pic.Show()
What to Explain
- Coordinates:
(0, 0)is the top-left corner. X goes right, Y goes down. - RGB colors: Three numbers (0–255) for Red, Green, Blue.
(255, 0, 0)= pure red. - Layering: Things drawn later appear on top of things drawn earlier.
FillRectangle(x, y, width, height)draws a filled rectangle at that position.FillEllipse(x, y, width, height)draws a filled oval/circle.
Bonus: Form Designer
Neuridion can also create real desktop windows with buttons, text fields, sliders, and more using the Form module. While forms aren't part of the 5 core lessons, they're a great next step for students who want to build "real apps."
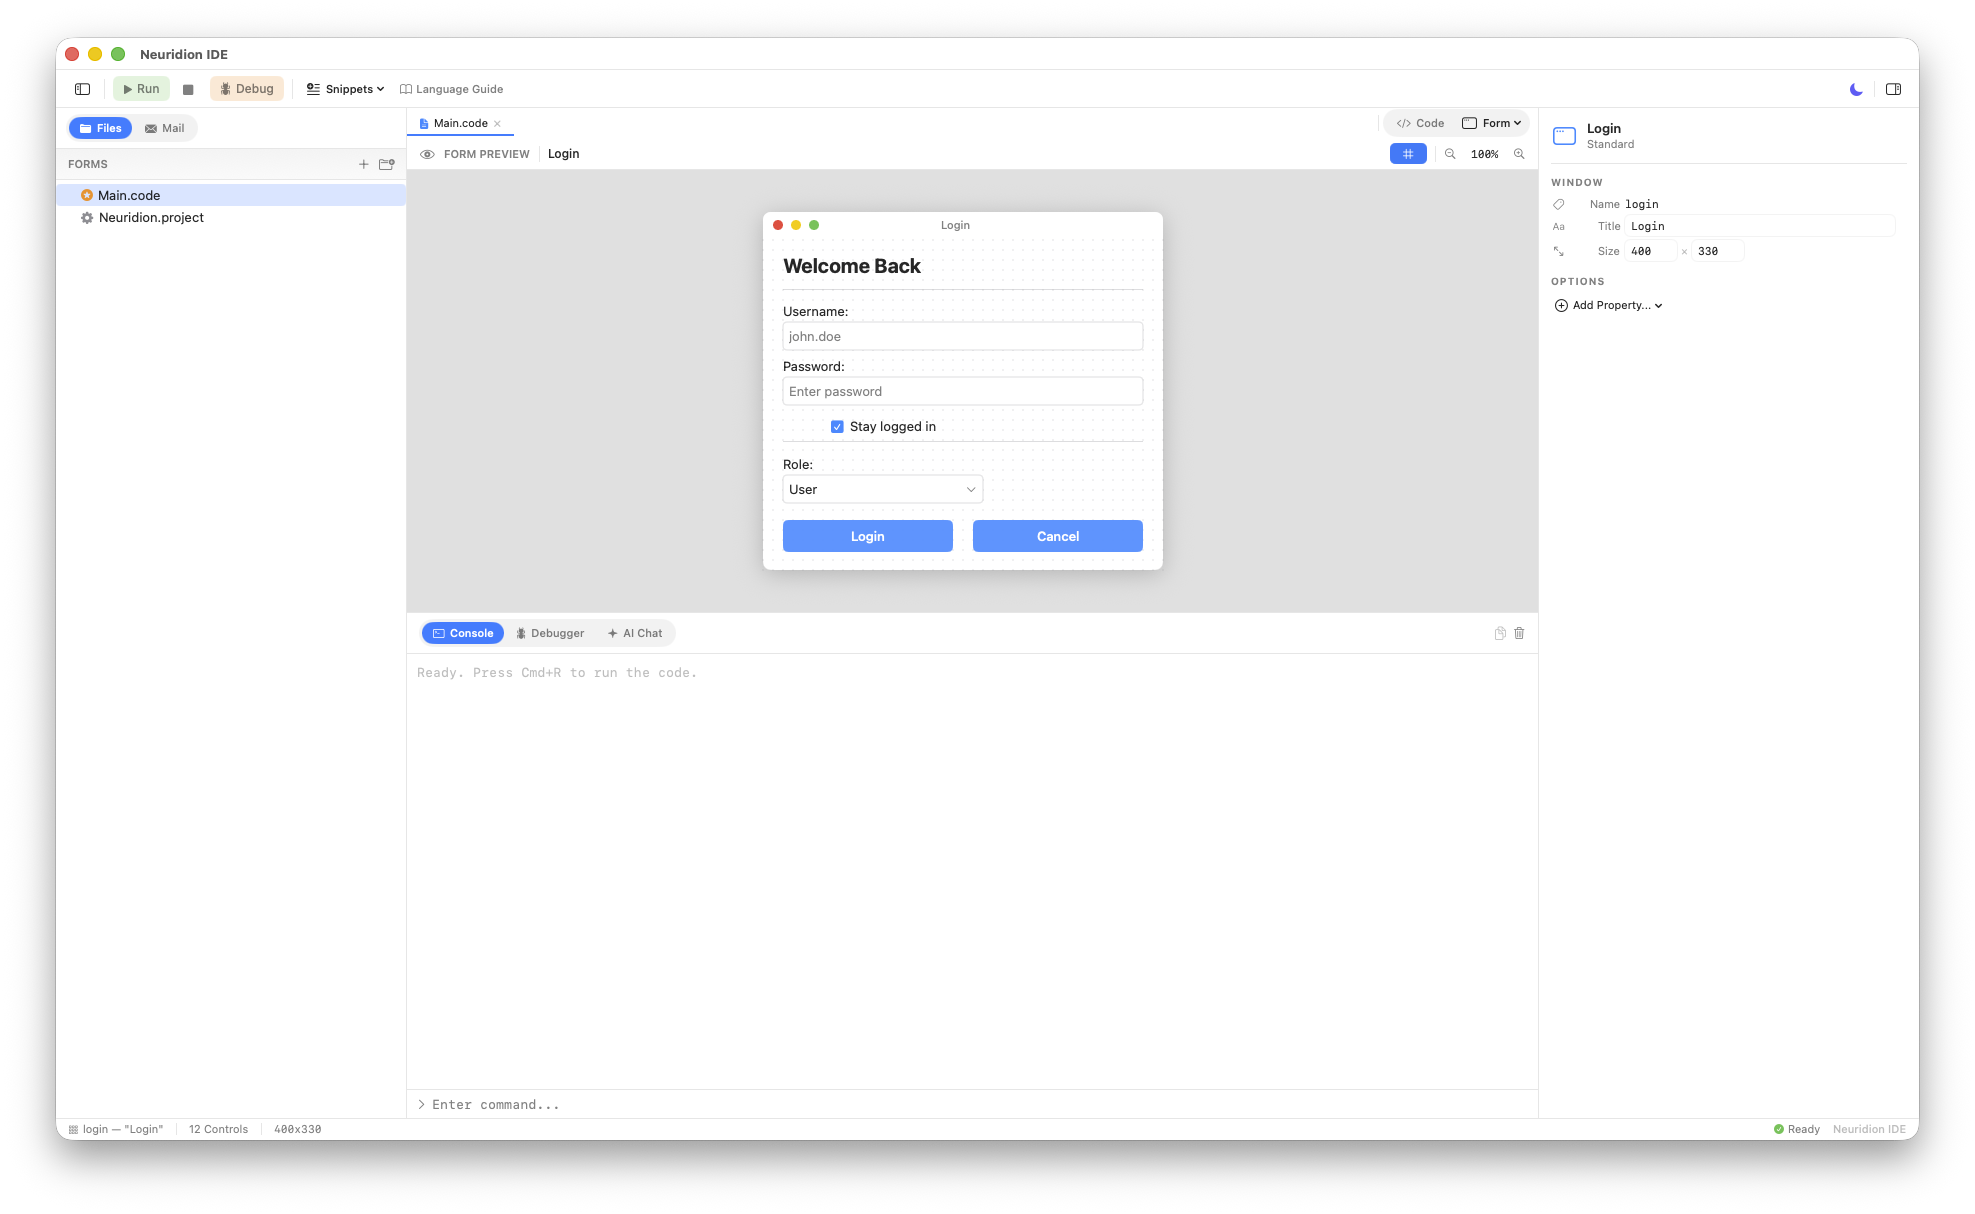
A login form created entirely in Neuridion code — the IDE shows a live preview.
Tips for Teachers
Start with Results, Explain Theory Later
Don't begin with "what is a variable." Begin with "let's make the computer say hello." Theory is only meaningful once students have experienced what the code does. The sequence should always be: do → see → understand.
Let Students Modify and Experiment
Copying code teaches typing, not programming. After showing an example, immediately challenge students to change something. "Change the greeting to Spanish." "Make it count to 20." "Add multiplication to the quiz." Ownership comes from modification.
Celebrate Every Small Success
The first Print("Hello") is a big deal. The first working If statement is a milestone. The first time a loop runs correctly deserves applause. Programming is hard — acknowledge the effort.
Pair Programming Works Great
Two students at one computer, one "driving" (typing) and one "navigating" (thinking and suggesting). Switch roles every 10 minutes. This reduces fear, increases discussion, and often produces better code than solo work.
Embrace Errors
When a student gets an error, don't fix it for them. Say: "Read the error message — what does it tell us?" Error messages in Neuridion are designed to be helpful and point to the exact line. Learning to read errors is one of the most important programming skills.
The built-in debugger lets students step through code line by line and inspect variables — perfect for understanding how programs work.
Keep Sessions Short
15–30 minutes of focused coding is better than an hour of frustration. If energy drops, take a break or switch to a creative challenge. Programming requires intense concentration — respect that.
Common Errors & How to Help
| Error | Cause | Fix |
|---|---|---|
Expected "As" after variable name |
Missing type annotation | Every Var needs As Type: Var x As Integer = 5 |
Unterminated string |
Missing closing quote | Check that every " has a matching " |
Expected "End If" |
Missing block closing | Every If needs End If, every While needs End While |
Cannot convert "text" to Integer |
Type mismatch | Use .ToInteger() to convert strings to numbers |
Undefined variable |
Variable used before declaration | Make sure Var name As Type = value comes before using name |
| Nothing happens after Run | No Print() statement |
Remind students that code runs silently unless you tell it to Print |
Beyond the 5 Lessons
Once students complete all five lessons, they have a solid foundation. Here are directions they can explore next:
More Examples in the IDE
The IDE comes with 39 built-in examples covering databases, charts, encryption, networking, audio synthesis, and much more. Students can browse the EXAMPLES section on the Welcome screen and create projects from any example.
The Kids Guide
The Kids tab in the Documentation window contains a comprehensive guide written directly for kids, with fun explanations, challenges, and step-by-step tutorials. It covers the same concepts as these lessons but in a self-directed format.
Project Ideas
- Story Generator — Use AI + variables to create random stories
- Calculator — Build a form-based calculator using the Form module
- Weather Display — Fetch weather data with Network and display it
- Art Gallery — Create multiple drawings and save them as PNG files
- Quiz Show — Expand the math quiz with different topics and difficulty levels
- Translator App — Build a form where users type text and select a target language
The Language Guide
For students ready to go deeper, the Language tab in Documentation contains the full Neuridion language reference with every keyword, operator, and standard library module documented.
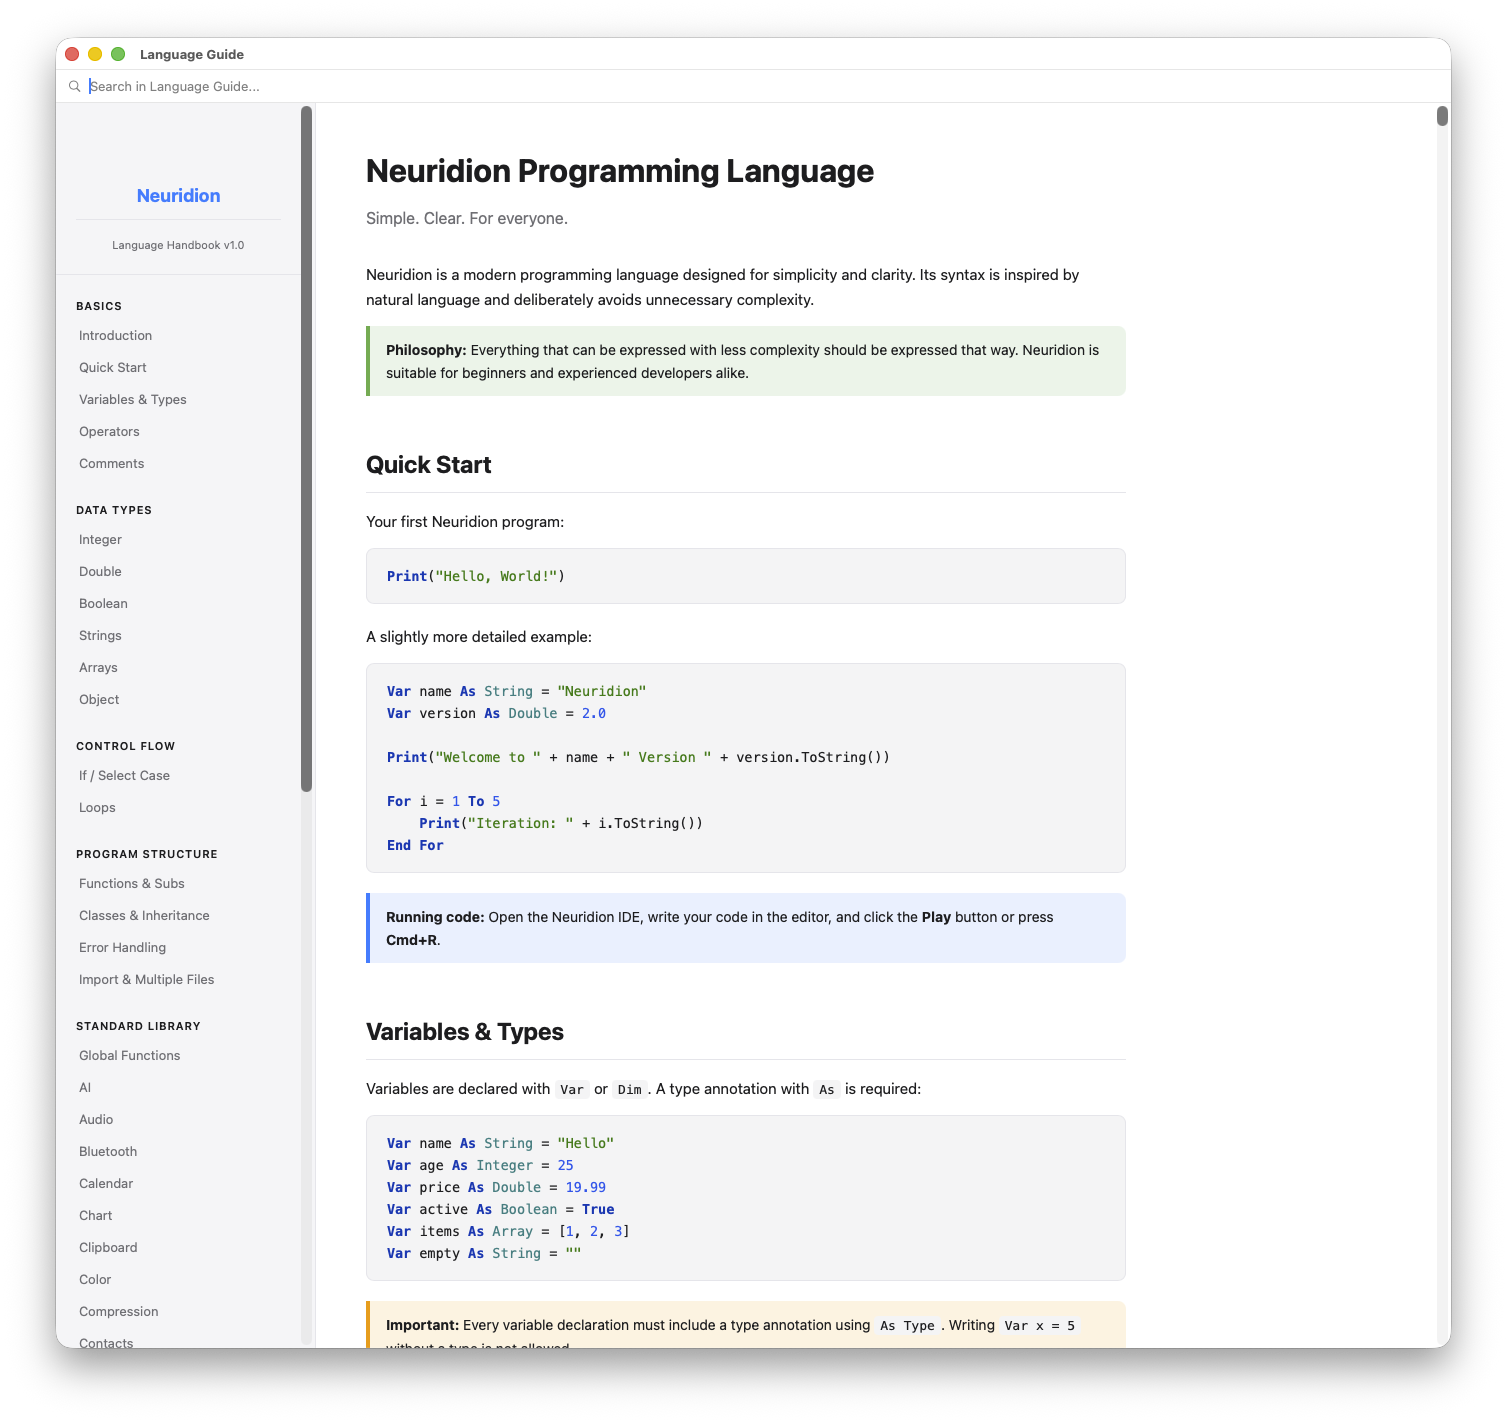
The Language Guide — a complete reference for the Neuridion programming language.